No products in the cart.
Return To Shop


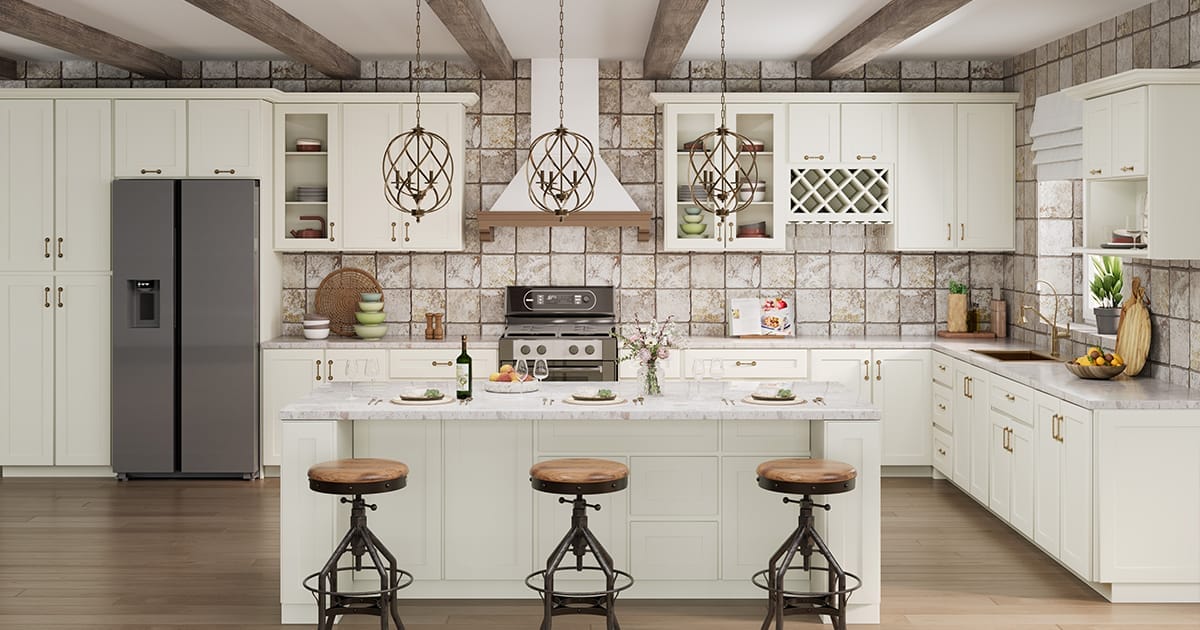
Ultimate Summer Kitchen Cabinet Remodel Guide — Plan, Budget & Avoid Mistakes
Summer is prime time for kitchen cabinet remodels: longer days, easier scheduling, and faster deliveries can shave weeks off a project. But summer also magnifies supply delays, heat-sensitive finishes, and contractor bottlenecks—risks that can drive up costs and stretch timelines if you’re not prepared. This Summer Edition guide walks you through planning a successful cabinet remodel—from assessing your space and choosing between RTA and pre-assembled options, to realistic budgeting, summer-specific scheduling, and the common pitfalls to avoid. Read on for practical, purchase-ready tips and a real-life case study to help you finish on time and on budget.
Table of Contents
Why Summer Is the Best Time to Remodel Your Kitchen
Summer offers some of the most favorable conditions for a kitchen remodel. The warm weather and longer daylight hours make it easier for contractors to work longer shifts, speed up installation, and allow for better ventilation—especially when sanding, painting, or installing finishes. Scheduling tends to be more flexible as many families take vacations during the summer, minimizing disruption to daily life.
Another often-overlooked benefit of remodeling during summer is how natural light can positively influence design decisions. With abundant daylight streaming through your windows, it’s easier to evaluate cabinet colors, countertop samples, backsplashes, and lighting fixtures in real-world conditions. This can help you avoid costly mistakes that sometimes happen when colors are chosen under artificial lighting. If you’re considering a two-tone cabinet design or pairing bold hardware with neutral finishes, viewing these elements in full sunlight offers a more accurate sense of contrast and tone.
Of course, summer isn’t without its challenges. It’s peak season for contractors, meaning you’ll need to schedule well in advance. Popular materials may also have longer lead times due to higher demand, and some finishes—such as oil-based paints or certain adhesives—may cure too quickly in high heat, potentially affecting quality. But with thoughtful planning and early ordering, these issues can be managed effectively.
In short, summer provides a sweet spot for kitchen remodeling—with longer days, better weather, and enhanced natural lighting for design decisions—making it one of the smartest times of the year to bring your dream kitchen to life.

Step 1: Assess Your Space & Define Goals
Every successful kitchen remodel starts with a clear understanding of your existing space. Begin by taking precise measurements of your kitchen. Use graph paper or a digital tool to create a scaled sketch, marking the exact locations of walls, windows, doors, electrical outlets, plumbing, appliances, and any permanent fixtures or architectural obstructions (like soffits or structural beams).
If you’d like a deeper, step-by-step walkthrough, check out our guide: How to Measure Your Kitchen for Cabinets (2025 DIY Measurement Guide).
Once you’ve captured the technical aspects, it’s time to define your remodeling goals. Ask yourself:
- Do you need more storage space for cookware, dry goods, or small appliances?
- Are you looking to create an open-concept kitchen that flows into the dining or living room for entertaining?
- Is accessibility a priority for aging in place or accommodating family members with limited mobility?
- Do you want to add more natural light, or enhance the functionality with a kitchen island or breakfast nook?
Understanding your goals will help determine whether your existing layout can be optimized or whether a full reconfiguration is needed. For example, a U-shaped kitchen might offer more storage but limit traffic flow, whereas an L-shaped layout with an island could support socializing and food prep simultaneously.
Also, consider your pain points with the current kitchen: Is there not enough counter space? Is the refrigerator too far from the stove? Identifying these frustrations will help guide functional upgrades in your new design.
Pro Tip: Take photos of your kitchen from multiple angles. They’ll help you and your designer spot design opportunities and are also useful if you’re comparing before-and-after transformations later.
Step 2: Plan Your Layout Like a Pro
First, pick a layout that fits your space and lifestyle — then optimize the details so the kitchen actually works day to day.
The 6 Most Common Kitchen Layouts
This list covers the fundamental kitchen layouts, each ideal for different spaces and needs.
1. Single-Wall (or One-Wall)
- Best for: Small homes, studios, and open-plan lofts.
- Description: All cabinets, appliances, and the sink are installed along a single wall. This is a space-saving solution that is efficient in very compact areas but can lack counter and storage space.
2. Galley (or Corridor)
- Best for: Narrow spaces and single-cook kitchens.
- Description: Features two parallel walls or countertops with a walkway in between. This layout is highly efficient, creating a compact “work triangle,” but can feel cramped if the corridor is too narrow or has traffic from both ends.
3. L-Shaped
- Best for: Small to medium-sized kitchens and open-plan areas.
- Description: Utilizes two adjacent walls forming an “L” shape. This layout is versatile, efficient, and opens easily to adjacent dining or living areas, making it a very popular choice.
4. U-Shaped
- Best for: Medium to large kitchens that require ample workspace.
- Description: Consists of countertops and cabinets on three adjacent walls, forming a “U” shape. It provides maximum counter and storage space and an efficient work triangle for serious cooks.
5. Island
- Best for: Open-concept homes with ample floor space.
- Description: An addition to another layout (often L-Shaped or U-Shaped), a freestanding island adds extra prep surface, seating, storage, and can often house appliances like a cooktop or sink.
6. G-Shaped
- Best for: Large kitchens that need even more storage and counter space than a U-Shape offers.
- Description: Essentially a U-Shaped layout with a fourth, partial peninsula or counter attached to one end. This creates a “G” shape, offering even more storage and defining the kitchen space more clearly from the rest of the room.
Summary: The best layout for your kitchen depends on the available space, your cooking habits, and how you want the kitchen to interact with the rest of your home.

Work triangle & flow
Think of the sink, stove, and refrigerator as a single system. Arrange them so movement between them is short and unobstructed. As a practical rule of thumb, keep the walking distance between each pair reasonably short (commonly targeted at about 4–9 feet) so prep, cook, and clean tasks don’t feel like a workout.
Practical, hands-on layout tips
- Protect the triangle from through-traffic. Avoid placing a main hallway or frequently used doorway through the work triangle — people passing behind the cook are the most common annoyance.
- Keep appliance doors from blocking aisles. Make sure refrigerator, oven, and dishwasher doors won’t swing into the main walkway. If the fridge opens toward a corridor, the door can block the path — consider a counter-depth fridge or a different hinge side.
- Allow proper aisle clearance. Minimum single-cook aisles: 36 inches. For two cooks working opposite each other: 42–48 inches is more comfortable.
- Landing space matters. Provide at least 15–24 inches of counter space immediately next to the refrigerator and range so you have a place to set groceries, hot pans, or prepping bowls. No landing = constant juggling.
- Plan for drawer & door swings. Drawers need full extension to be useful — avoid placing island seating or narrow passages where large drawers or a double oven door must open.
- Think vertical & corner solutions. Use lazy Susans, diagonal pull-out trays, or bi-fold corner pullouts to make corner cabinets accessible instead of wasted space.
- Place the microwave thoughtfully. Built-in microwave towers or under-counter units free up counter space and keep sightlines clear (better than a bulky countertop microwave in many kitchens).
- Zone your kitchen. Group together prep, cooking, cleaning, and storage zones. For example: prep counter next to sink, pots/pans near range, plates and glasses near dishwasher, pantry items in a pull-out pantry by the fridge.
- Island overhang & clearance for seating. For comfortable seating allow 12–15 inches of overhang and keep 36–48 inches of clearance behind seated guests to circulate.
- Think about sightlines & entertaining. If you cook while entertaining, orient the island or sink so you face guests (or place a low backsplash) — small choices make the kitchen feel more social.
- Accessibility & aging-in-place. If accessibility is a priority, plan lower countertops in prep zones, pull-out shelves, lever handles, and wider aisles (at least 42 inches) to accommodate mobility devices.
Smart upgrades that improve flow
- Pull-out pantry systems — fast access with a small footprint.
- Corner pullouts / blind-corner solutions — turn dead corners into usable storage.
- Built-in oven/microwave towers — better ergonomics and cleaner sightlines.
- Under-sink organizers & trash pull-outs — keep the cleaning zone efficient and tidy.
- Appliance garages for small appliances — keep counters clear without losing accessibility.
Quick checklist before you commit
- Can two people cook without bumping into each other?
- Do fridge/oven/dishwasher doors open without blocking traffic?
- Is there a landing zone for groceries and hot pans?
- Are major walkways at least 36″ wide (42–48″ if you expect multiple cooks)?
- Will drawers and appliance doors open fully?
Small changes in placement and a few thoughtful clearances make a huge difference in daily use.
Step 3: Budget Breakdown & How to Avoid Surprise Costs
You already have a clean percentage breakdown — nice job. What those line items typically cover, the common hidden costs to watch for, and concrete money-saving tips you can act on today.
Budget breakdown
- Cabinets (40–50%) — boxes, door/drawer fronts, hardware, delivery, and any cabinet installation labor or modification fees.
- Countertops (10–15%) — material, fabrication (cutting/seams), sink cutouts, and installation.
- Appliances (10–20%) — purchase price, delivery, and hookup (gas/electric).
- Labor (15–25%) — installers, plumbers, electricians, and any specialty trades.
- Plumbing / Electrical (5–10%) — new rough-ins, moving fixtures, permitting inspections.
- Miscellaneous (10%) — paint, backsplash, trim, light fixtures, permit fees, demo & disposal, small tools, and contingency items.
Leave a 10–20% contingency on top of this for unknowns.
Hidden costs you should explicitly budget for
- Permits & inspections — checklist these with your city; they’re required for most structural/electrical/plumbing work.
- Site prep & remediation — leveling floors, removing old tile, or discovering mold/asbestos/lead paint.
- Structural work — removing load-bearing walls, beam reinforcement, or moving windows/doors.
- Panel upgrades / electrical service — older homes often need higher amps for modern ranges, ovens, or EV chargers.
- Plumbing upgrades — outdated pipes or re-routing may be more than a quick swap.
- Shipping & hold/warehouse fees — oversized cabinet shipments can incur extra charges or storage fees if your site isn’t ready.
- Countertop seams & backsplash overages — odd layouts can increase material waste.
- Change orders — design changes after work starts often carry premium hourly or rush charges.
- Temporary kitchen / living costs — eating out, portable cooktops, or short-term rentals if the remodel displaces you.
- Disposal & dumpster — hauling demo debris isn’t always included in contractor quotes.
- Permit of HOA approval or inspection delays — extra time can mean additional temporary living costs.
Budget-saving tips that actually work
- Keep the plumbing footprint — moving sinks, ranges, or refrigerators drives cost up fast. If possible, reuse existing locations.
- Stick to standard cabinet sizes — custom sizes increase both cabinet and install time costs. Consider semi-custom or RTA for big savings.
- Buy bundled appliance packages — retailers often give discounts for 3–4 appliance buys and include free delivery/haul-away.
- Order long-lead items early — cabinets, custom counters, and special finishes are typically the bottleneck. Early ordering reduces rush fees.
- Refinish vs replace — solid-wood cabinets can often be refinished or re-painted affordably to extend life.
- Shop scratch-and-dent or floor models — great deals if cosmetic flaws are minor.
- Use laminate or engineered quartz alternatives — they mimic high-end looks at a fraction of the cost in many cases.
- Negotiate a phased plan — split non-essential items into a second phase to spread cost and avoid big financing hits.
- Get multiple bids — at least 3 bids for major trades; compare scope line-by-line, not just bottom price.
- Ask about manufacturer promotions & rebates — energy-efficient appliances can bring utility rebates and tax rebates in some states.
- Factory-direct or local makers — cutting out middlemen can give better value, especially for standard box lines.
How to avoid surprise costs — contract & process checklist
- Fixed-price (lump sum) contract for clearly defined scope — avoids hourly creep. If hourly, require regular detailed timesheets.
- Detailed scope & allowances — list exact models, finishes, and allowances for paint/tiles. If you pick a tile that costs more than the allowance, you pay the difference — be prepared.
- Change-order process — require written change orders with price and schedule impact before work proceeds.
- Payment schedule tied to milestones — small deposit, progress payments at defined milestones, final payment on completion and lien waivers.
- Verify lead times in writing — have the contract call out delivery windows and penalties or procedures if lead times blow out.
- Confirm who is responsible for site cleanup and dumpster — include it in the contract.
- Lien waivers on final payment — ensures subs have been paid and protects you from future claims.
- Confirm warranty & return policies in writing — cabinetry, countertops, appliances, and labor — who to contact and for how long.
Quick checklist before you sign anything
- Is a realistic 10–20% contingency included?
- Does the scope list brands/models or vague “to be selected” items (avoid vagueness)?
- Who pays if items are re-ordered or returned because of mismeasurement?
- Do you have written lead times for cabinets/counters/appliances?
- Are permit fees and inspection scheduling included or excluded?
- Is there a written change order policy and hourly rates for additional work?
Step 4: Choose Materials, Style, Finish & Colors
Here’s a compact, homeowner-friendly comparison plus practical guidance you can use right away when picking cabinets, door styles, finishes and hardware for the U.S. market.
| Material | Pros | Cons | Price Tier (typical installed price per linear foot, USD) | Best for / Tips |
|---|---|---|---|---|
| Solid wood | Very durable, refinishable, premium look | Expensive; can expand/contract with humidity | $300 – $1,200 / ft (typical installed) | Traditional / high-end kitchens; choose stable species (maple, oak, cherry) and acclimate before install. |
| Plywood | Strong, moisture-resistant, good screw-holding | More costly than particle board; core quality varies | $150 – $600 / ft (typical installed) | Excellent cabinet boxes; great balance of price and performance. |
| MDF (doors/frames) | Smooth surface for paint, consistent, affordable | Not waterproof if soaked; heavier | $50 – $300 / ft (typical installed) | Best for painted doors; avoid in wet locations unless sealed well. |
| Particle board / melamine | Cheapest, lightweight, widely used in RTA | Less durable; poor screw retention; vulnerable to moisture | $30 – $200 / ft (typical installed) | Good for budget RTA cabinets or temporary solutions; keep away from damp areas. |
Price note: Prices shown are typical U.S. installed ranges per linear foot; actual project costs can vary depending on door style, finish, hardware, labor, and regional market conditions.
Door styles & how to choose
- Shaker: Versatile, clean, and high resale appeal — works for traditional and transitional kitchens.
- Slab: Modern and minimalist; shows flaws easily, so requires high-quality material/finish.
- Raised panel: Formal, classic — pairs well with traditional moldings and ornamentation.
Finishes, hardware & color guidance
- Painted finishes: Great for bold colors (soft blue, pale green) and smooth looks (use MDF or high-quality painted wood). Choose durable cabinet-grade paint and finish (polyurethane topcoat) for longevity.
- Stained / natural wood: Shows grain and warms a kitchen—ideal for natural wood tones. Match stain to flooring undertones (warm vs cool).
- Hardware: Brushed gold adds warmth and a luxe feel; matte black creates contrast and a modern edge. Pick finishes that coordinate with faucets and lighting for cohesion.
- Edge details: Rounded edges wear better in family kitchens; crisp square edges read modern but chip more noticeably.
For a more in-depth look at materials, styles, and finishes, be sure to read our Ultimate Kitchen Cabinet Buying Guide.
Summer color trends — practical application
- Creamy white: Timeless, brightens small kitchens; watch for yellow undertones under incandescent bulbs.
- Pale green / soft blue: Calming, pairs well with butcher block or warm wood tones. Test samples in morning and evening light.
- Natural wood tones: Add warmth—use on islands or lower cabinets for contrast with painted uppers.
Pair trend colors with neutral countertops (quartz or light granite) and a complementary backsplash to avoid visual overload.
Practical selection & pairing tips
- Order physical samples. Never pick colors from a photo—order door samples, paint chips, and countertop swatches and view them together at different times of day.
- Test in-situ. Tape a cabinet door sample to the actual cabinet face and live with it for a week to see how light and adjoining finishes affect it.
- Coordinate undertones. Make sure wood stains, floor tones, and countertop veining share a warm or cool bias—mixing undertones creates visual friction.
- Think about maintenance. High-gloss and light colors show smudges less or more depending on finish—matte paints hide fingerprints but can be harder to clean.
- Durability vs. look tradeoff. In busy kitchens favor plywood boxes with durable painted or thermofoil doors; reserve solid wood or high-end finishes for focal pieces (island, hood).
- Hardware scale. Larger door profiles call for bigger pulls; small shaker doors often look best with slim pulls or knobs.
Quick maintenance & longevity checklist
- Seal painted cabinetry edges and underside of doors to reduce moisture ingress.
- Use cabinet liners or vapor barriers in beach/humid coastal areas.
- Choose soft-close hinges/drawer slides for long-term wear reduction.
- For open shelving, pick hardwood or finished plywood and plan for regular dusting.
Step 5: Summer Timeline Planning
Here’s an expanded, practical version of your 6-week sample timeline, plus a stronger emphasis on why ordering early matters, and concrete steps to avoid seasonal delays.
Sample 6-week timeline
Week 1–2 — Measure, plan, finalize design
- Final measurements, layout sign-off, finish selections, and appliance model numbers.
- File permit applications if required (permits often add lead time).
Week 3–4 — Order cabinets & long-lead items, prepare the space
- Place orders for cabinets, countertops, appliances, and any specialty items. Confirm lead times in writing.
- Prepare site: clear storage, arrange temporary kitchen, and schedule dumpster.
Week 5–6 — Demolition and installation
- Demo, rough plumbing/electrical, cabinet install, countertop templating/fabrication, final installs and punch list.
- Plan for countertop templating to happen only after cabinets are installed — this often adds a 1–2 day slot.
Why “order early” is critical
Manufacturers and remodelers strongly recommend ordering cabinets well before demolition because lead times can stretch during busy seasons. Industry guidance suggests pre-ordering months in advance (for example, 6–9 months is commonly recommended to reduce lead-time risk).
Real-world reports from homeowners and remodel forums in summer 2024 show this is not theoretical — late orders led to multi-week waits. For example, homeowners discussing their projects reported cabinet delivery windows moving by weeks (one forum thread referenced a two-month cabinet delay that significantly pushed the install schedule). That kind of slip can turn a 6-week plan into a multi-month headache.
Practical steps to avoid seasonal backlogs
- Order long-lead items first. Cabinets, customized countertops, and some appliances are the usual bottlenecks — order them as soon as design is finalized.
- Get lead times in writing. Include expected ship dates and penalties/plan if lead times slip.
- Build extra buffer into your contract. Add at least a 10–20% time contingency (in addition to your cost contingency) during summer months.
- Choose in-stock options if your timeline is fixed. Many retailers list in-stock or quick-ship lines for faster delivery.
- Confirm staging & storage. If items arrive before site readiness, confirm where and who will accept/inspect them to avoid warehouse/storage fees.
- Have a backup plan for temporary cooking. Budget for an alternate cooking plan (microwave, grill, campground stove, or short-term rental) if delays occur.
- Communicate weekly with your contractor and suppliers. Frequent check-ins surface issues early so you can pivot (e.g., select an in-stock door style instead of waiting on a custom finish).
Quick homeowner checklist (before Week 3)
- Have you ordered cabinets and confirmed the ship date in writing?
- Do appliance orders include delivery + haul-away windows?
- Is there a signed plan for temporary kitchen needs?
- Does your contractor include allowances and clear change-order rules to avoid surprise schedule slips?
- Have you budgeted for at least a 2-week schedule buffer during summer peak season?
Step 6: Mistakes to Avoid When Remodeling in Summer
Summer speeds projects — and it also amplifies a few failure modes. Here’s an example of what can go wrong and what to do instead.
Top summer mistakes (and how to avoid them)
1. Failing to provide adequate ventilation
Problem: Heat + construction dust, paint fumes, or solvent vapors = uncomfortable and unsafe indoor air.
Fixes:
- Run exhaust fans and set up cross-ventilation (open windows + box fans).
- Use portable HEPA dust collectors during demo and sanding.
- For painting/finishing, ventilate to the outside and consider temporary window exhausts or negative-pressure fans.
- Provide contractors with cool drinking water and schedule regular breaks — OSHA/NIOSH heat guidance applies.
2. Forgetting to set up a temporary cooking area
Problem: No place to cook during demo leads to daily takeout and frustration.
Fixes:
- Plan a “temporary kitchen” (microwave, hot plate, toaster oven, mini-fridge, or outdoor grill).
- Keep a small clear counter space for plates/utensils and a trash bin.
- Budget for this in your timeline and contingency.
3. Underestimating heat’s effect on materials (adhesives, paints, finishes)
Problem: High temperatures and humidity can cause finishes to cure too fast, bubble, blister, or not adhere properly — and adhesives may set incorrectly.
Specific paint/finish guidance (what to avoid during heat waves):
- Avoid applying solvent-based (alkyd/oil) enamels outdoors or in unconditioned spaces when ambient temperatures exceed the product’s recommended range. In very high heat these finishes can flash-dry and trap solvents, causing bubbling or poor adhesion.
- Avoid spraying or brushing fast-drying, high-VOC solvent finishes during heat waves and high humidity — the rapid skin formation can trap solvents underneath.
- Prefer high-quality water-based cabinet enamels or waterborne conversion varnishes that are formulated for cabinet work and usually tolerate a wider range of conditions; they also have lower odor and VOCs.
- Always follow manufacturer temperature/humidity specs. Typical guidance you’ll see on product labels: avoid application if surface or ambient temp is above ~85°F (or below ~50°F) or if relative humidity is very high — but check the label because specs vary.
- Adhesives & sealants: use construction adhesives rated for your climate and for the substrate; some “fast-set” adhesives cure too quickly in heat and don’t allow repositioning. If humid/very hot, choose products with specified temp/humidity ratings or use mechanical fasteners where possible.
Practical steps:
- Paint during the cooler parts of the day (early morning or evening) or in a climate-controlled area.
- Keep materials shaded and acclimatize wood and panels indoors for 48–72 hours before finishing.
- Use fans/AC or dehumidifiers to control the environment in the workspace (especially for spray finishing).
- Ask your finisher what brand/product they recommend for high-heat/humid conditions and confirm acceptable temp/RH ranges in writing.
4. Not confirming delivery times during peak season
Problem: Missed deliveries mean crews wait — and waiting = schedule slips and extra labor cost.
Fixes:
- Get delivery windows in writing and confirm 48–72 hours before arrival.
- Arrange for safe on-site or local warehouse receipt if delivery comes before installation.
- Ask about expedited shipping costs up front.
5. Choosing style over function
Problem: Beautiful layout that’s hard to use becomes daily regret.
Fixes:
- Prioritize landing spaces, aisle clearance, and appliance door swings over strictly aesthetic choices.
- Use samples and mockups for hardware scale and handle comfort.
Additional summer-specific cautions
- Heat fatigue for trades: Working in direct sun or hot attics slows crews and can reduce workmanship quality. Ask how your contractor plans to mitigate heat stress.
- Sun-fade risk for samples: Color samples left in direct sun can look different — always evaluate samples indoors and outdoors at different times of day.
- Moisture intrusion after sudden storms: Summer storms can cause water intrusion during open-top demo; ensure roof/temporary coverings are planned.
- Temporary living costs: If a heat-driven delay extends your timeline, factor additional living and meal costs into contingency.
Quick “what to avoid during a heat wave” cheat sheet (practical)
- Avoid: Applying oil-based/alkyd enamels or solvent spray finishes in >85°F and/or high humidity without climate control.
- Avoid: Using “fast-set” adhesives that leave no time for repositioning in hot conditions.
- Avoid: Leaving unfinished wood or cabinetry exposed to direct sun — it can warp or discolor.
- Do: Use water-based, cabinet-grade finishes when possible; finish in a climate-controlled space; confirm product temp/RH limits.
Final checklist before summer work begins
- Have you confirmed manufacturer application temperature/humidity limits for all paints, adhesives, and finishes?
- Is a climate-controlled finishing area available (shop or conditioned garage)?
- Are ventilation and shade planned for on-site work?
- Have you scheduled the most heat-sensitive tasks for cooler parts of the day or cooler weeks?
- Do you and your contractor have a heat-safety plan for workers (water, breaks, shaded rest)?
Case Study — The Lee Family’s Summer Kitchen Makeover
Overview
The Lees bought a 1970s townhouse with a cramped galley kitchen that was dark and inefficient. Their goals: open the layout slightly, gain storage, update lighting, and keep the project on a 6–8 week summer timeline so guests could enjoy the new space by Labor Day.
Before
- Narrow galley layout with one small window and soffit-hung oak cabinets.
- No dedicated pantry; limited counter landing space.
- Poor task lighting and an awkward refrigerator placement that blocked the main aisle when open.
Plan & Scope
- Reworked layout to a compact U-shaped plan with a short peninsula for a landing zone and casual seating.
- Replaced old oak with white Shaker-style cabinets (upper painted, lower natural wood tone on the peninsula for contrast).
- Added quartz countertops, LED under-cabinet task lighting, pendant lights over the peninsula, and a pull-out pantry next to the fridge.
- Kept major plumbing locations unchanged to reduce cost.
Cabinet choice
- What they used: White Shaker, Pre-Assembled, soft-close drawers, full-extension undermount slides.
- Why it worked: Pre-assembled Shaker offered a clean, timeless look while cutting site labor time — this helped them meet a tight summer schedule.

Timeline & Results
- Project length: 6 weeks from demo to punch-list (demo 2 days; rough trades 5 days; cabinet install + countertop templating 10 days; finishing + punch 10 days).
- Outcome: 25% more usable storage (measured by roll-out drawer count and pantry volume), improved lighting, and an open, airy entertaining zone. The family reported reduced daily friction (less walking during prep) and higher home enjoyment.
Customer quote
“We went from stumbling over the fridge door to having plenty of landing space for groceries and a place to chat while cooking. The team finished on schedule and the white Shaker cabinets make the whole house feel lighter.” — Mrs. Lee
FAQ
How long does a summer kitchen remodel take?
Typically 4–6 weeks, depending on the scope.
Can I remodel while on vacation?
Yes, with good planning and a trusted contractor.
Which materials handle summer heat best?
Plywood for cabinet boxes and UV-resistant finishes are ideal.
What if my cabinets are delayed?
Order early and have contingency storage or schedule backup.
RTA or pre-assembled—what’s better for summer installs?
RTA offers cost savings but takes more time; pre-assembled is quicker.


About author
Related posts

Picture this. You are preparing a romantic dinner at home. The vegetables are in the refrigerator on one side of the kitchen. The cutting board... Continue reading
A kitchen is more than a place to cook. It is where everyday life happens. It is where coffee is made in the morning, meals... Continue reading

Have you ever opened a cabinet and couldn’t find what you needed—only to end up pulling everything out just to reach one item in the... Continue reading
Remodeling a kitchen can feel overwhelming.There are so many decisions, and honestly, it’s easy to get something wrong that you’ll regret later. But if you... Continue reading

If you’re planning a kitchen, you might be wondering:“Do I really need more drawers… or are shelves and pull-outs enough?” After years of working with... Continue reading


Add comment