No products in the cart.
Return To Shop


Cabinet Installation 101: What Every DIYer Should Know
In every home, the kitchen stands as its beating heart—a space that blends warmth, creativity, and function. And at the center of this heart? The cabinets. They frame the kitchen’s style, organize our essentials, and set the tone for everything from family breakfasts to late-night conversations. Installing them might seem daunting, but with the right preparation and mindset, even a first-time DIYer can bring a designer’s vision to life.
As a kitchen designer who’s spent decades watching spaces transform from blueprints to real homes, I’ve learned that cabinet installation isn’t just a technical process—it’s the bridge between design and living. Here’s how to make that bridge as seamless (and beautiful) as possible.
Table of Contents
1. Design Meets Preparation
Before you even pick up a drill, step back and look at your kitchen as a whole.
How does light move through the space? Where do people naturally gather? These questions help shape not only your layout but also your cabinet choice.
Measure twice, design once. Accurate measurements of walls, ceilings, and flooring levels are the foundation of a flawless installation. Uneven surfaces are more common than most think—an eighth of an inch off at the floor can turn into a full inch by the ceiling. Use a laser level if possible, and note any dips or bumps early.

When it comes to style, your cabinets should speak to your home’s personality.
- Shaker cabinets, with their timeless lines, bring calm and symmetry.
- Modern slab fronts, in contrast, offer sleek simplicity.
- Transitional styles bridge the two, pairing classic structure with contemporary finishes.
Light tones—like soft whites or pale greige—expand small kitchens and create an airy effect. Darker hues like navy or espresso add drama and visual depth. The goal isn’t just installation—it’s transformation. For more guidance on selecting the right cabinet style for your home, explore our full design guide: The Art of Choosing Kitchen Cabinets.
2. The Right Tools for the Job

Every craftsman has their essentials. For cabinet installation, your toolkit should include:
- Power drill and bits
- Stud finder
- Level and measuring tape
- Clamps and shims
- Safety glasses and work gloves
Before starting, turn off nearby electrical sources and protect floors from scratches.
A pro tip from years on the job: ten minutes spent prepping your workspace can save two hours of corrections later.
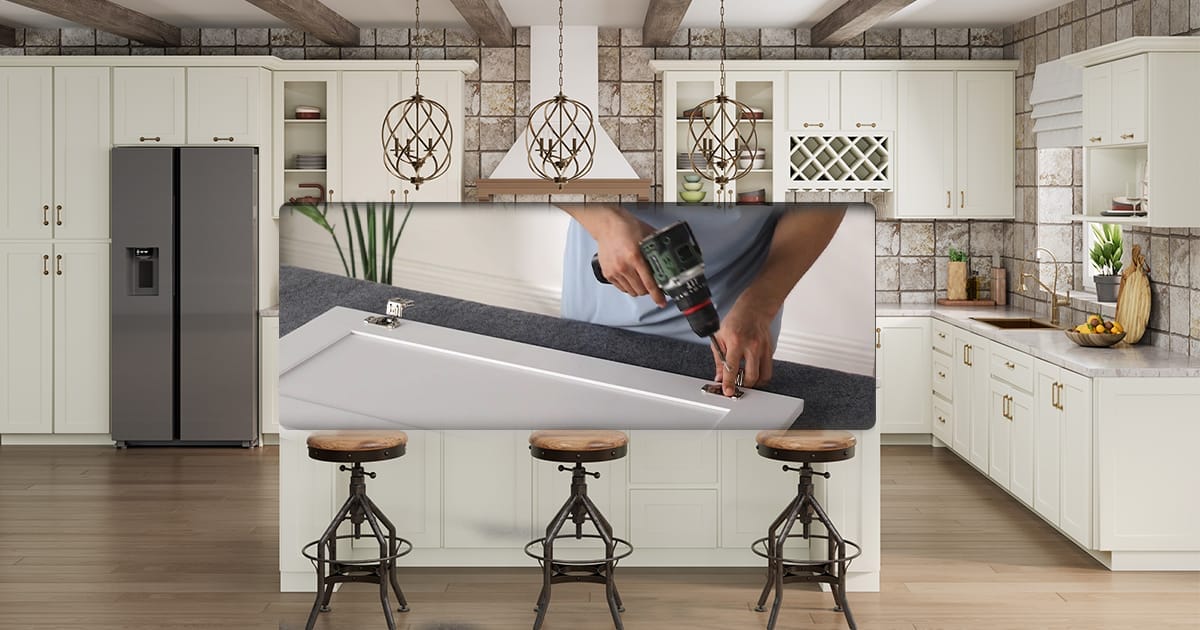
3. Step-by-Step Installation

A detailed step-by-step guide on how to install Shaker kitchen cabinets properly—from locating wall studs to leveling, anchoring, and finishing for a flawless fit.
Step 1: Find and Mark Studs
Locate the wall studs with a stud finder and mark their positions along your installation line. These will anchor your cabinets securely. Without solid backing, even the most beautiful cabinetry can shift or sag over time.
Step 2: Start with the Upper Cabinets
Always begin from the top down—it’s easier to align and install uppers before the base cabinets block your movement. Have a helper hold the cabinet in place, check for level, then secure it into studs using cabinet screws.
Step 3: Check for Level & Plumb
Perfection lies in patience. Use your level after every few screws to ensure the cabinets remain straight. Adjust with shims where needed. A half-inch deviation may seem minor but becomes painfully visible once doors and crown molding are installed.
Step 4: Set the Base Cabinets
Now move to the base units. Make sure they’re level across all fronts, and confirm proper spacing for appliances—dishwasher, stove, refrigerator.
Think of this stage as building the foundation for your countertop. If the base isn’t perfect, nothing above it will be.
Step 5: Fine-Tune and Finish
Once everything is anchored, check all doors, drawers, and gaps. Even spacing gives a sense of craftsmanship. Remember, darker cabinets magnify any misalignment, while lighter tones forgive small inconsistencies.
4. Appliances, Plumbing, and the Big Picture
One of the biggest mistakes I see is installing cabinets in isolation—without considering plumbing, venting, and lighting. The position of your sink or dishwasher can dictate cabinet width and layout, while electrical outlets often determine where upper cabinets can safely mount.
A designer’s perspective: Cabinets should never fight the space they live in.
Instead, they should harmonize with appliances and utilities to make everyday tasks effortless. Think flow—how easily can someone move from prepping to cooking to cleaning? That rhythm defines a functional kitchen.
5. Common Pitfalls to Avoid
Even seasoned DIYers can fall into a few traps:
- Skipping wall measurements – assuming your walls are straight rarely ends well.
- Ignoring floor unevenness – a single unlevel cabinet can throw off the whole run.
- Forgetting appliance clearance – leave at least ¼” on each side for flexibility.
- Overlooking ventilation and plumbing lines – they can easily interfere with installation if not planned ahead.
- Rushing hardware installation – handles and pulls are small, but misaligned ones will haunt you forever.
As I often tell my clients: a good installer measures three times and cuts once—because a perfect fit is silent proof of care.
6. The Beauty of DIY Craftsmanship
There’s something deeply rewarding about standing back after a long day, looking at a perfectly hung set of cabinets, and realizing you did it yourself.
Beyond saving money, DIY installation builds a connection to your home that store-bought solutions never could.
And here’s where artistry meets practicality—don’t just install, curate. The soft sheen of brushed nickel handles, the texture of natural wood grains, or the interplay between your backsplash and cabinet tone—these are the details that transform a space from functional to unforgettable.
7. Final Thoughts
Installing cabinets is both an art and a science—a blend of technical precision and creative vision.
Whether you’re refreshing a small apartment kitchen or transforming a family home, the process teaches patience, problem-solving, and appreciation for craftsmanship.
When the final hinge clicks into place and your kitchen comes alive, you’ll realize: this isn’t just cabinetry. It’s the framework of countless future meals, memories, and moments that make a house truly feel like home.
If you’re ready to start your own kitchen journey, explore our selection of RTA (Ready-to-Assemble) and Pre-Assembled cabinets—crafted for both DIYers and professionals. With the right foundation, every dream kitchen can begin with your own two hands.
FAQ
Q1: How long does cabinet installation take?
Usually one to two days for an average kitchen, depending on layout and preparation.
Q2: Can I install cabinets myself?
Yes—if you’re comfortable with tools and follow measurements carefully. RTA cabinets are ideal for DIYers.
Q3: Should flooring go under the cabinets?
For most materials like hardwood or tile, it’s best to install flooring first.
Q4: What’s the most important installation tip?
Always check for level and plumb—precision here ensures a professional finish.


Related posts

Receiving the keys to a new home is an exciting milestone yet it often brings an important and sometimes confusing question. What is the best... Continue reading

The kitchen is far more than a place for cooking meals. In many American homes it has become a central space for daily routines family... Continue reading

Kitchen cabinets play a vital role in both the function and visual identity of a kitchen. Among all cabinet components, cabinet doors are the most... Continue reading

The colors you choose for your home don’t just paint walls—they shape moods, create feelings, and influence how every day unfolds. In 2026, whole home... Continue reading

In modern home renovation projects, custom cabinetry has become a core element in both kitchen and bathroom planning. Choosing the right custom cabinet supplier is... Continue reading


Add comment