No products in the cart.
Return To Shop


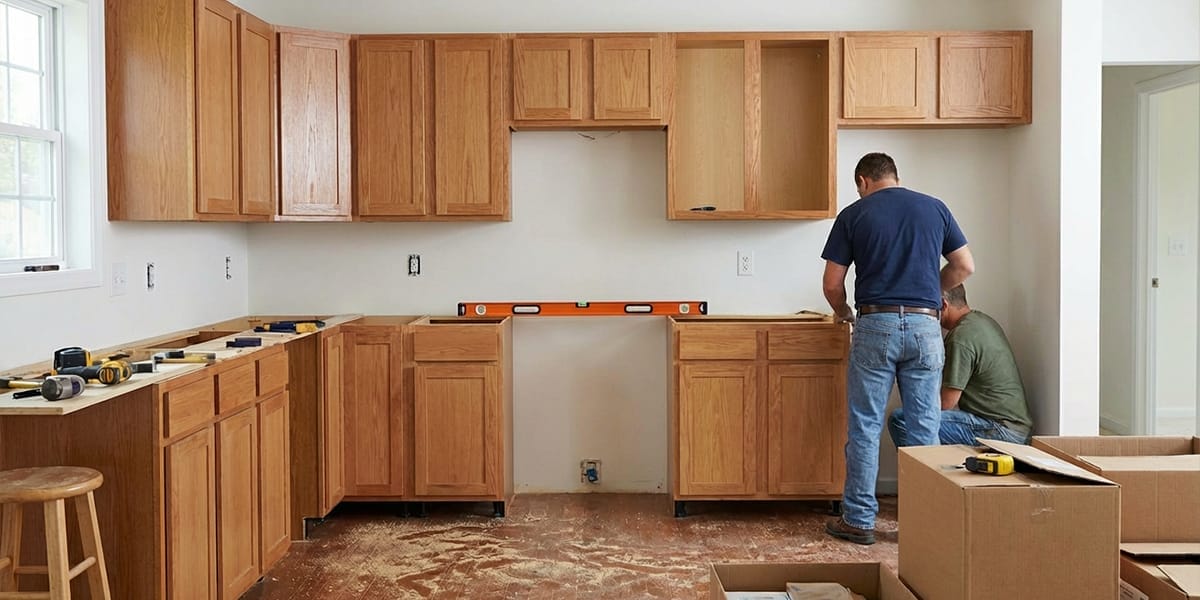
Knowing the RTA Cabinet Installation Process in Advance
When a kitchen is being renovated or updated, many installation tasks are involved. There are also hidden and surface finishing works that need to be completed before the custom cabinets can be installed. Once the style and size of the cabinets are confirmed, the manufacturer will usually take care of transportation and installation. This does save us a lot of effort, but it is still important to understand the installation process. Knowing the steps helps prevent improper operations that might damage the cabinets and affect their appearance and performance. This article will walk you through a few simple tips for installing Ready to Assemble (RTA) kitchen cabinets.
Table of Contents
Preparations Before Installation
1. Clean the area in advance
After confirming where the cabinets will be installed, the tile joints in that area should be filled first. Then clean the entire space thoroughly. This way, when the cabinets arrive, installation can start right away. It saves time and avoids unnecessary trouble.
2. Mark the locations of hidden water and electrical lines
Cabinet installation requires drilling holes in the wall. Before drilling, mark the positions of hidden pipes and wires to prevent accidental damage during the process.
Installation Steps

Base cabinets
Start by measuring the dimensions and finding a reference point, then connect the base cabinets together. It is important to check the level of the floor first, then adjust the cabinet level accordingly. The connection between cabinets also matters. Four connectors are required to secure the cabinets together. The tighter the connection, the more stable and practical the setup will be.
Wall cabinets
Draw a level line on the wall so the expansion screws can be installed along the same height. Wall cabinets also need to be tightly connected before mounting. After installation, adjust them so the position remains aligned. This helps maintain both appearance and functionality.
Countertop
When installing the countertop, pay attention to the curing time of the adhesive. Different seasons require different bonding times. Most countertops today are made of engineered or natural stone, and the amount of adhesive and curing time varies by material. If the mixture is not prepared well, the appearance may be affected.
For summer installations, the curing time is usually around half an hour. In winter it may take one to one and a half hours. Professional adhesive must be used to ensure a strong and tight bond. To achieve a smooth surface at the joints, workers will also need to sand and polish the area.
Hardware
After the cabinets are installed, the sink and pull out baskets need to be fitted. To prevent leakage, sealing strips or silicone must be applied carefully where the sink and hoses connect. The hose and drain also need to be sealed well so the system does not leak or release unpleasant smells.
Cabinet doors
Once the main structure, hardware, and sink are in place, it is time for final adjustments. Workers will adjust the angle and height of each door so the gaps are even and the lines appear straight. After the adjustments are done, the area will be cleaned again so the kitchen looks tidy. These small details ensure the cabinets remain smooth to use and visually appealing in the long run.
Choose a reliable brand
To be honest, whether the installation goes smoothly is largely determined even before the work begins. Many people who ask me about installation steps eventually ask another question: how should they choose a cabinet brand? I usually suggest looking at quality, transportation, and after sales service. Among the brands I have worked with, RaraRTAcabinets has been quite stable.
They offer both ready to assemble kitchen cabinets and pre-assembled options. Their cabinet quality is reliable and they have multiple warehouses in the United States, which keeps delivery times predictable. More importantly, they are willing to send material samples. This gives customers confidence from the very beginning. You can see the sample first, and if it does not meet your expectations, you can change the style or even request a refund. This greatly reduces the chance of running into problems later. Once you choose the right brand, the installation and daily use will naturally become much easier.


Related posts

If you’re planning a laundry setup on your balcony, one question matters more than anything else: What kind of cabinet will actually last—and not turn... Continue reading

If you’re planning a kitchen upgrade, installing a new sink might seem like a simple task. I’ve had many homeowners tell me,“It looks easy enough—I’ll... Continue reading

If your kitchen feels tight, cluttered, or just hard to work in—you’re not alone. I’ve worked with plenty of homeowners across the U.S., and honestly,... Continue reading

When planning a bathroom remodel, many homeowners focus on tile, lighting, or paint colors. But after working with bathroom designs for many years, I’ve learned... Continue reading
A wall mounted wine rack is more than just a storage solution. In many homes, it becomes a subtle design feature that adds personality and... Continue reading


Add comment