No products in the cart.
Return To Shop


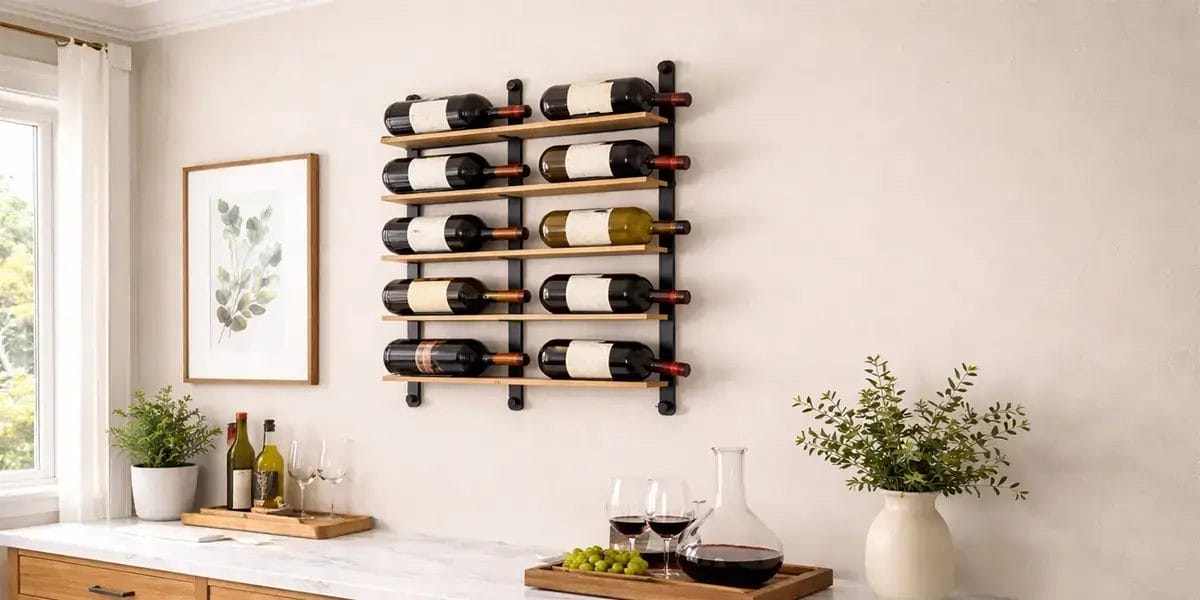
How to Install a Wall Mounted Wine Rack Safely
A wall mounted wine rack is more than just a storage solution. In many homes, it becomes a subtle design feature that adds personality and warmth to the space. Instead of hiding bottles inside cabinets, a well placed wine rack allows your collection to become part of the room’s character.
For homeowners who enjoy cooking, hosting friends, or relaxing with a glass of wine after a long day, a wall mounted rack offers both convenience and visual appeal. It saves valuable floor space while turning an empty wall into something functional and elegant. In kitchens, dining rooms, or even small apartments, a thoughtfully installed wine rack can instantly elevate the atmosphere.
However, installing a wine rack on the wall is not just about aesthetics. Safety and stability are equally important. Wine bottles are heavier than many people expect, and a poorly installed rack can loosen over time or even detach from the wall. As someone who has worked in kitchen and interior design for many years, I always tell homeowners the same thing: a beautiful installation should also be a safe one.
The good news is that installing a wall mounted wine rack is a manageable project if you follow the right steps.
Table of Contents
Why Wall Mounted Wine Racks Are So Popular
In modern home design, vertical storage solutions have become increasingly popular. Instead of filling rooms with bulky furniture, homeowners are learning to use wall space more efficiently.
A wall mounted wine rack offers several advantages:
Space saving design
Because the rack is mounted on the wall, it frees up valuable floor and counter space. This is especially helpful in smaller kitchens or apartments.
Decorative appeal
Wine bottles themselves can become decorative elements. When displayed properly, they create a relaxed yet sophisticated look.
Easy access
Unlike cabinets where bottles are hidden away, a wall rack keeps your favorite wines within reach.
Flexible placement
Wine racks can be installed in kitchens, dining areas, home bars, or even hallways depending on the layout of the home.
But for the rack to look great and function properly, installation needs to be done carefully.

Step-by-Step Guide to Installing a Wall Mounted Wine Rack
Step 1: Inspect the Components and Prepare Your Tools
Before starting the installation, unpack the wine rack and make sure all components are included. Most wall mounted racks come with mounting brackets, screws, anchors, and basic installation instructions.
Take a few minutes to check that nothing is damaged or missing. Look closely at the rack frame, brackets, and mounting holes.
You will typically need the following tools:
- Cordless drill
- Screwdriver
- Level
- Measuring tape
- Pencil for marking
- Wall anchors (if not included)
Having everything ready before you begin will make the installation process much smoother.
Step 2: Choose the Right Wall Location
The location you choose is critical for both safety and convenience.
Ideally, the rack should be installed on a solid wall, such as:
- Concrete walls
- Brick walls
- Wooden wall studs
These materials provide the best load bearing support. If you are installing the rack on drywall, make sure the screws go into wall studs or use heavy duty anchors designed for drywall.
Another important factor is height. In most homes, the ideal installation height is between 48 and 60 inches (about 1.2–1.5 meters) from the floor. This height allows easy access while keeping the rack safely out of the way.
Also take a moment to check that there are no hidden pipes or electrical lines behind the drilling area.
Step 3: Install the Mounting Brackets
Once the location is decided, hold the bracket against the wall and use a pencil to mark the drilling points.
Before drilling, place a level on top of the bracket to make sure it is perfectly horizontal. Even a small tilt can make the rack look uneven once installed.
Drill holes at the marked points and insert the wall anchors if necessary. Then attach the brackets using the screws provided.
Make sure the brackets sit firmly against the wall with no gaps or movement.
Step 4: Mount the Wine Rack
After the brackets are secured, it’s time to mount the rack itself.
Align the rack’s mounting slots or hooks with the brackets and gently lower it into place. Because some racks can be heavy or awkward to handle, it is often easier if two people perform this step together.
Working slowly will help avoid scratching the rack or damaging the brackets.
Step 5: Check Alignment and Stability
Once the rack is mounted, place the level on top again to confirm that everything is straight.
If the rack appears slightly uneven, small adjustments can often be made by loosening the screws slightly and repositioning the brackets.
After alignment is confirmed, tighten all screws securely.
Before placing wine bottles on the rack, gently apply pressure to ensure it feels stable and does not shift or wobble.
Important Safety Tips for Wine Rack Installation
Even a well designed rack can become unsafe if installed improperly. Here are a few important precautions to keep in mind.
Make Sure the Wall Can Support the Weight
Wine bottles are heavier than they look. A fully loaded rack may hold several dozen pounds of weight. Always confirm that the wall and hardware can safely support the load.
Avoid Installing the Rack Too High
Installing the rack too high makes bottles difficult to reach and increases the risk of dropping them. A comfortable height improves both safety and usability.
Use High Quality Hardware
Cheap screws or weak brackets can compromise the entire installation. Always use sturdy mounting hardware that matches the wall type.
Protect the Rack from Moisture
If the rack is made from wood or metal, avoid installing it in areas with high humidity. Excess moisture can cause wood to warp or metal to corrode over time.
Distribute Bottle Weight Evenly
When placing bottles on the rack, try to distribute them evenly rather than loading one side heavily. This helps maintain balance and prevents unnecessary stress on the brackets.
Final Thoughts
Installing a wall mounted wine rack is a small project that can make a surprisingly big difference in your home. With thoughtful placement and proper installation, it can turn an empty wall into a functional and stylish feature.
More importantly, a securely mounted rack allows you to store and display your wine collection with confidence. Whether you enjoy hosting weekend dinners, sharing a bottle with friends, or simply appreciating good design, a well installed wine rack quietly adds both beauty and practicality to your living space.
Sometimes the best home upgrades are the simplest ones—and a carefully installed wine rack is a perfect example of that.


Related posts

If you’re planning a laundry setup on your balcony, one question matters more than anything else: What kind of cabinet will actually last—and not turn... Continue reading

If you’re planning a kitchen upgrade, installing a new sink might seem like a simple task. I’ve had many homeowners tell me,“It looks easy enough—I’ll... Continue reading

If your kitchen feels tight, cluttered, or just hard to work in—you’re not alone. I’ve worked with plenty of homeowners across the U.S., and honestly,... Continue reading

When planning a bathroom remodel, many homeowners focus on tile, lighting, or paint colors. But after working with bathroom designs for many years, I’ve learned... Continue reading

Glass cabinets have become an increasingly popular choice in modern home design. Their transparent surfaces bring a sense of lightness and elegance that traditional solid... Continue reading


Add comment