No products in the cart.
Return To Shop


Ultimate Guide to Cabinet Hinge Installation, Adjustment, and Repair
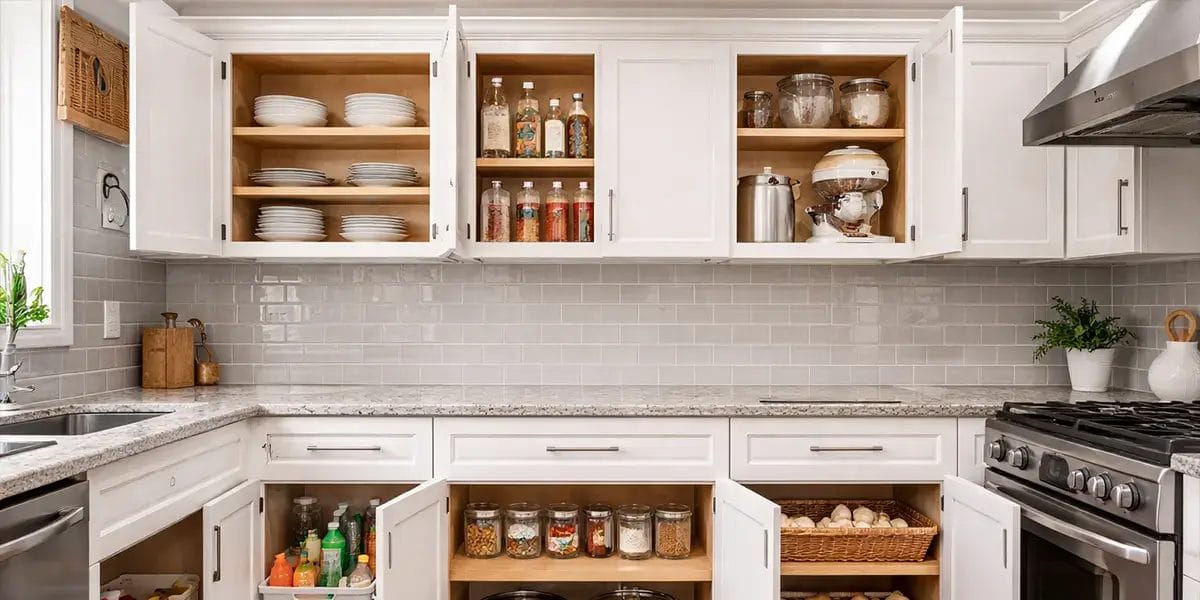
Cabinet doors may seem like a simple part of your kitchen, but anyone who has installed or adjusted them knows how much hinges matter. A well installed hinge allows cabinet doors to open smoothly, close quietly, and stay perfectly aligned for years. When hinges are installed incorrectly, however, the result can be frustrating: crooked doors, uneven gaps, squeaking noises, or doors that refuse to close properly.
After working with kitchen cabinetry for many years, I have seen how small installation details can make a big difference in everyday use. The good news is that cabinet hinge installation and adjustment are not overly complicated when you understand the process. With the right tools and a bit of patience, homeowners can achieve professional looking results.
This guide walks you through the key steps of installing, adjusting, and repairing cabinet hinges so your cabinets function smoothly and reliably. If you’re installing new cabinets during a kitchen renovation, choosing well-built cabinetry can also make hinge installation much easier. Many homeowners today prefer Ready to Assemble cabinets because they combine affordability with easy installation.
Table of Contents
Standard Installation Steps for Cabinet Hinges
Before starting installation, it is important to prepare the proper tools. Having everything ready will make the process much easier and more accurate.

Common tools include:
- Measuring tape
- Marking pencil
- Cordless drill
- Phillips screwdriver
- Flathead screwdriver
The first step is measuring and marking the hinge positions on both the cabinet door and the cabinet frame. Accurate markings are extremely important. Even small positioning errors can cause cabinet doors to sit unevenly later.
Once the locations are marked, drill pilot holes for the screws. The spacing must match the hinge specifications exactly. Pilot holes help guide the screws and prevent the cabinet material from cracking or splitting.
One mistake I often see during DIY installations is drilling holes that are either too deep or not aligned with the hinge plate. Ideally, the pilot hole depth should match the screw length so the screw can hold firmly without damaging the cabinet panel.
After drilling the holes, attach the hinge cup to the cabinet door first. Once the hinge is secured to the door, connect the hinge arm to the cabinet frame or mounting plate. Tighten the screws gradually rather than forcing them all at once. This helps keep the hinge aligned and prevents shifting during installation.
Taking your time during this stage will save you a lot of adjustment work later.
How Many Hinges Does a Cabinet Door Need?
Another important detail many homeowners overlook is the number of hinges required for each cabinet door. Using too few hinges can cause doors to sag over time.
As a general guideline:
| Cabinet Door Height | Recommended Hinges |
|---|---|
| Up to 36 inches | 2 hinges |
| 36 – 60 inches | 3 hinges |
| Over 60 inches | 4 hinges |
Heavier doors, especially solid wood doors, may require additional support. Proper hinge placement ensures weight is evenly distributed and helps cabinet doors maintain alignment for years.
Precise Adjustment Methods for Cabinet Doors
Even with careful installation, cabinet doors may need small adjustments. Fortunately, modern concealed hinges are designed with adjustment screws that allow movement in multiple directions.
These adjustments are simple once you understand what each screw controls.
Adjusting Door Depth
If a cabinet door sits too far inward after closing, adjust the depth screw located toward the back of the hinge arm. Turning this screw slightly forward will move the door outward.
Small adjustments are key. A quarter turn can make a noticeable difference.
Adjusting Side to Side Alignment
If the gaps between cabinet doors look uneven, the side adjustment screw will help. This screw moves the door left or right to create consistent spacing between doors.
This adjustment is especially useful when installing double cabinet doors.
Adjusting Door Position
If a cabinet door sticks out too far or does not close flush with the frame, adjusting the hinge depth and mounting screws will usually solve the issue.
When making adjustments, open and close the door several times to test the result. It is much easier to correct alignment gradually rather than making large adjustments all at once.
How to Fix a Loose or Detached Cabinet Hinge
Loose or detached hinges are another common issue in kitchens that get daily use.
The first step is identifying the cause of the problem.
If the hinge itself is damaged — such as bent metal, cracked components, or a failed soft close mechanism — replacing the hinge is usually the best solution. Trying to repair a damaged hinge often leads to repeated problems later.
However, in many cases the issue is simply stripped or loosened screws.
When screws no longer grip properly, replacing them with slightly larger self tapping screws can restore stability. Another simple trick professionals sometimes use is inserting small wooden toothpicks or wood filler into the stripped hole before reinstalling the screw. This helps create a tighter grip.
After reinstalling the hinge, open and close the door several times to confirm that it moves smoothly and stays aligned.
Choosing High Quality Cabinet Hinges
Not all cabinet hinges are created equal. The quality of the hinge has a direct impact on how your cabinets feel and perform over time.
High quality hinges typically offer:
- Smooth opening and closing
- Soft close functionality
- Quiet operation
- Durable metal construction
Low quality hinges often feel stiff or uneven when opening. Over time they may loosen, squeak, or even warp under the weight of the door.
When selecting hinges, pay attention to craftsmanship details such as the thickness of the metal, the quality of the coating, and the smoothness of the hinge movement. These small details often determine whether a hinge will last five years or twenty.
Many homeowners are surprised by how much better cabinets feel after upgrading to well designed soft close hinges.
Important Precautions During Installation
Before installing hinges, always verify that the hinge type matches the cabinet door design. Overlay, inset, and full overlay cabinets all require slightly different hinge styles.
Another important factor is weight capacity. Using hinges that are not rated for the weight of the cabinet door can lead to sagging and misalignment over time.
During installation, make sure all hinges are aligned along the same vertical axis. Even a small misalignment can cause cabinet doors to twist or close unevenly.
Finally, whenever possible use the screws provided by the hinge manufacturer. These screws are designed specifically for the hinge and help ensure proper fastening strength.
A Small Detail That Makes a Big Difference
Cabinet hinges might seem like a minor piece of hardware, but they play a huge role in how your kitchen feels every day. When hinges are installed and adjusted correctly, cabinet doors open effortlessly, close softly, and stay aligned for years without constant maintenance.
In a busy kitchen, these small details create a sense of comfort and reliability. Taking the time to install hinges properly is one of those simple improvements that homeowners appreciate every single day.


About author
Related posts

For years, homeowners on Reddit’s r/kitchenremodel and r/DesignMyRoom have asked the same question: “Are two-tone kitchen cabinets a timeless classic, or just a trendy style... Continue reading

When people shop for new cabinet doors, they often focus on color, style, or finish first. That makes sense. But in real home projects, the... Continue reading

Painting bathroom cabinets is not the same as painting a dresser or a living room shelf. A bathroom is a humid space, which means the... Continue reading
Floating cabinets are beautiful. They make a space feel lighter, cleaner, and more refined. No bulky legs, no visual clutter — just a clean, modern... Continue reading

Cabinets take up a large part of any kitchen, bathroom, or laundry room. When the color no longer feels right, the whole space can start... Continue reading


Add comment