No products in the cart.
Return To Shop.png?sharp=1)



How to Measure Your Kitchen for Cabinets: Step-by-Step Guide
Accurate kitchen measurements are essential before ordering kitchen cabinets. A small error in wall length, appliance space, window location, or ceiling height can affect cabinet fit, filler requirements, door clearance, countertop planning, and installation.
To measure a kitchen for cabinets, you need more than the overall room dimensions. Record each wall, ceiling height, doors and windows, appliances, plumbing, electrical connections, vents, soffits, and other fixed obstacles that could affect the cabinet layout.
Before creating your final layout, it also helps to understand common base, wall, and tall cabinet dimensions. Review our kitchen cabinet size guide to compare standard cabinet dimensions while planning your space.
This step-by-step guide shows you what to measure, where to measure from, and what information to include on your kitchen floor plan before sending your dimensions to a cabinet designer or placing an order.
Before you start: These measurements are suitable for initial cabinet planning and design. Before final ordering or installation, verify critical dimensions again and confirm appliance and fixture requirements from the manufacturer.
Once you have an approximate cabinet layout and linear footage, use our kitchen cabinet cost estimator to create a preliminary budget before requesting a final quote.
After completing your measurements, you can also use our 2026 RTA Cabinets Buying Guide to compare cabinet construction, door styles, finishes, hardware, and purchasing options.

Table of Contents
- Get Ready: Tools and Prep for Accurate Measuring
- Draw Your Kitchen Floor Plan: The Blueprint for Success
- Measure Walls and Ceilings: Precision is Key
- Doors, Windows & Obstacles: Don’t Overlook the Details
- Appliances and Utilities: Record Critical Dimensions
- Cabinet Placement: Understand the Key Measurements
- Common Measurement Mistakes and How to Avoid Them
- Measurement Tips for More Accurate Cabinet Planning
- Templates and Digital Tools to Simplify Measuring
- Final Pre-Order Checklist: Double-Check Everything
- Frequently Asked Questions About Measuring Your Kitchen
- Conclusion: Verify Your Measurements Before Ordering Cabinets
1. Get Ready: Tools and Prep for Accurate Measuring

1. Essential Tools for Kitchen Measurement
Accurate measurements start with a few basic tools. You do not need professional equipment, but using the same measuring method throughout the kitchen helps keep your floor plan consistent.
- Tape Measure: Use a rigid steel tape measure long enough for full wall runs. Avoid cloth measuring tapes because they can stretch.
- Graph Paper or Printed Grid: Use a simple scale, such as one square = 6 inches, so your sketch stays proportional.
- Pencil and Eraser: Write measurements directly on the drawing and correct them as needed.
- Level or Laser Level: Useful for checking whether walls, floors, and ceilings are level, plumb, or noticeably uneven.
- Step Ladder: Use a stable ladder when measuring ceiling height, soffits, or other elevated features.
- Laser Distance Measurer (Optional): Helpful for long wall runs, but important dimensions should still be double-checked.
- Smartphone: Take clear photos of every wall, corner, appliance, plumbing connection, outlet, and obstacle for later reference.
2. Prep Tips to Set Yourself Up for Success
Before taking measurements, make the main walls and fixed features easy to see.
- Clear countertops and move movable items away from the walls.
- Open cabinet doors and drawers if they block access to corners or plumbing.
- Make sure trim, baseboards, window casings, outlets, vents, and utility connections are visible.
- Take one wide photo of each wall before you begin.
- Have appliance model numbers or specification sheets available if you already know which appliances will remain or be installed.
Do not remove existing cabinets just to create an initial measurement plan. The goal at this stage is to document the room accurately enough for cabinet planning. Final dimensions can be verified again before ordering and installation.
3. Start With a Simple Kitchen Sketch
Draw a rough outline of the kitchen before recording detailed measurements. The sketch does not need to look professional—it only needs to show where each measurement belongs.
Choose one starting corner and work around the room in a single direction, either clockwise or counterclockwise. Label the walls A, B, C, and so on so you can match measurements and photos to the correct wall later.
On the sketch, mark:
- Doors and the direction they swing
- Windows and window trim
- Refrigerators, ranges, dishwashers, and other fixed appliances
- Sink and plumbing locations
- Electrical outlets and switches
- Gas connections
- Hood or ventilation locations
- Soffits, beams, columns, radiators, vents, and other obstacles
If a measurement seems unusual, measure it again before moving on. For important dimensions such as full wall lengths, window locations, and appliance openings, recording a second measurement can help catch simple mistakes.
Once your sketch and photos are ready, you can begin recording the exact wall, opening, appliance, and utility dimensions. If you plan to install the cabinets yourself, our Cabinet Installation 101 guide can also help you understand which measurements and clearances will matter later during installation.
If you want help turning your measurements into a cabinet layout, you can also submit your sketch or floor plan through our Free Room Design service. RARA currently accepts hand-drawn sketches, blueprints, and floor plans for design review.
2. Draw Your Kitchen Floor Plan: The Blueprint for Success
Once you have a rough kitchen sketch, turn it into a clearer floor plan that shows the room shape, wall lengths, openings, appliances, utilities, and fixed obstacles. The goal is not to create a professional architectural drawing. The goal is to give a cabinet designer enough information to understand the available space and identify potential layout conflicts.
A simple scaled drawing also makes it easier to compare different kitchen layouts before choosing cabinet sizes. If you are still deciding between an L-shaped, U-shaped, galley, one-wall, or island layout, review our kitchen layout guide before finalizing cabinet placement.
How to Draw Your Kitchen Floor Plan
1. Choose a Scale
Use graph paper or a digital drawing tool and choose one scale for the entire plan. For example, one square can represent 6 inches. Write the scale on the drawing so anyone reviewing the plan can interpret it correctly.
The exact scale matters less than using it consistently from beginning to end.
2. Draw the Room Perimeter
Start with the overall shape of the kitchen and draw each wall in proportion to its measured length. Label the walls A, B, C, and so on, using the same labels from your measurement sketch.
If the room includes angled walls, alcoves, bump-outs, or openings into another room, show them on the floor plan rather than simplifying the kitchen into a perfect rectangle.
3.Add Doors and Windows
Mark every door and window and record its width and position along the wall.
For doors, show the swing direction so you can identify areas where a cabinet, appliance, or countertop could interfere with the door.
For windows, record the distance from the nearest corner to the window trim. You will measure the sill height and full opening dimensions in more detail later.
4. Mark Appliances
Add the refrigerator, range or cooktop, dishwasher, microwave, wall oven, and other appliances that will remain in the kitchen or be included in the new layout.
Write the appliance width next to each item. If the exact model has already been selected, keep the manufacturer specification sheet with your floor plan because installation clearances can vary by appliance.
5. Mark Plumbing, Electrical, Gas, and Ventilation
Show the approximate position of:
- Sink drain and water supply
- Dishwasher connections
- Refrigerator water line
- Gas connection, if applicable
- Electrical outlets and switches
- Range hood or ventilation duct
- Dedicated appliance connections
Measure these locations from a fixed reference point, such as the nearest corner, rather than simply drawing them approximately in the middle of a wall.
6. Add Fixed Obstacles
Mark anything that could affect cabinet placement, including:
- Soffits or bulkheads
- Columns
- Beams
- Radiators or baseboard heaters
- Floor or wall vents
- Wall niches
- Access panels
- Uneven wall sections
- Other permanent architectural features
Include both the location and approximate dimensions so a designer can determine whether fillers, panels, or layout adjustments may be required.
Check Your Floor Plan Before Moving On
Once the main information is recorded, compare the drawing with the actual kitchen one more time.
- Every wall is labeled.
- Every wall length is recorded.
- Doors and windows are in the correct positions.
- Door swing directions are shown.
- Appliances are included.
- Plumbing, electrical, gas, and ventilation points are marked.
- Soffits, columns, vents, and other obstacles are shown.
- The drawing scale is clearly written on the plan.
Your floor plan does not need to look perfect. A clear hand-drawn sketch with accurate measurements and photos is often more useful for cabinet planning than a polished drawing with missing dimensions.
Optional Tip: Use Color Coding for Clarity
Color coding can make a hand-drawn floor plan easier to review, especially when several utilities and openings are close together. If you use colors, keep the same system throughout the drawing.
- Red: electrical outlets and switches
- Blue: plumbing and water connections
- Green: doors and windows
- Black or gray: walls, soffits, columns, vents, and other fixed obstacles
If you plan to send the measurements to a cabinet designer, keep the floor plan together with your kitchen photos and appliance specifications so the room can be reviewed as one complete set of information.
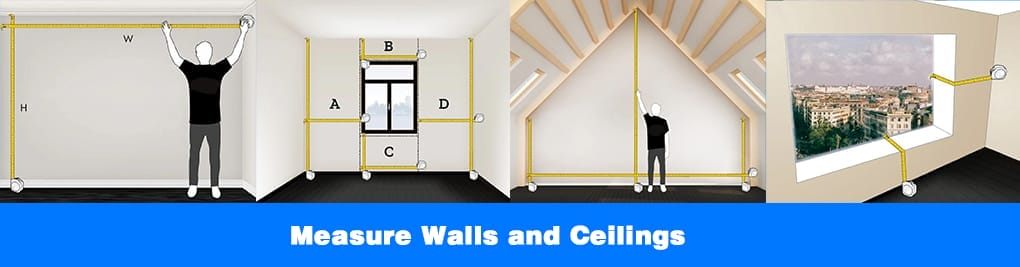
3. Measure Walls and Ceilings: Precision is Key
Accurate wall and ceiling measurements help determine how much usable space is available for base cabinets, wall cabinets, tall cabinets, fillers, panels, and trim. Do not assume that opposite walls, corners, floors, or ceilings are perfectly straight or level—record what is actually in the room.
1. Measure Each Wall Length
Measure each wall from finished corner to finished corner and write the dimension next to the corresponding wall label on your floor plan.
For each wall:
- Measure the full wall length first.
- Then measure smaller wall sections between corners, doors, windows, appliances, and other fixed features.
- Keep all measurements in the same unit and record fractions clearly.
- For long walls, use a helper or laser distance measurer if needed.
- Recheck any measurement that does not match the surrounding dimensions on your sketch.
Do not rely only on the total wall length. The smaller section measurements help show exactly where openings and obstacles are located.
2. Measure Ceiling Height at Multiple Points
Measure vertically from the finished floor to the ceiling at several locations along each wall, such as near the left side, center, and right side.
Record each measurement separately rather than assuming the ceiling height is identical throughout the room.
If the flooring will change during the remodel, note that on your plan because the final finished-floor height can affect the available vertical space for tall cabinets, wall cabinets, and trim.
3. Check for Uneven Walls and Ceilings
Walls and ceilings may be slightly bowed, sloped, or out of plumb, especially in older homes. Use a level or laser level to identify noticeable variations and mark them on your drawing.
Pay particular attention to:
- Corners where two cabinet runs will meet
- Walls where tall cabinets will be installed
- Areas where cabinets will extend close to the ceiling
- Long cabinet runs where small wall variations can become more noticeable
- Locations where end panels or fillers will meet an existing wall
You do not need to calculate installation adjustments at this stage. Simply record the condition so the cabinet designer or installer knows it needs to be checked before final installation.
4. Measure Soffits, Bulkheads, Beams, and Dropped Ceilings
Any feature that reduces the usable wall or ceiling space needs to appear on your measurement plan.
For each soffit, bulkhead, beam, or dropped ceiling, record:
- Width
- Height
- Depth
- Distance from the nearest wall or corner
- Length along the wall
If a soffit runs above existing wall cabinets, do not assume the new cabinets will fit underneath it without checking the actual clearance.
5. Check Space Above Wall and Tall Cabinets
If your design may include cabinets close to the ceiling, record the exact ceiling height and any soffits, beams, ceiling transitions, or uneven areas above the cabinet run.
Also note whether you plan to use crown molding or another top trim, because these details require additional planning between the cabinet and ceiling.
If crown molding is part of your design, our crown molding installation guide explains how cabinet height, ceiling conditions, and molding placement work together.
6. Verify the Measurements Before Moving On
Before measuring doors and windows, review the wall and ceiling dimensions one more time.
Check that:
- Every wall has a full length measurement.
- Smaller wall sections are also recorded.
- Ceiling height has been measured at multiple points.
- Soffits, beams, and dropped ceilings are marked.
- Uneven or noticeably bowed walls are noted.
- Measurements are written next to the correct wall labels.
- Photos are available for any unusual wall or ceiling conditions.
Planning tip: If one measurement differs significantly from the others, do not average the numbers. Record the actual measurements and mark where each one was taken so the designer or installer can determine how the variation affects the cabinet layout.
4. Doors, Windows & Obstacles: Don’t Overlook the Details
Doors, windows, trim, vents, radiators, and other fixed features can reduce the usable wall space for cabinets. Record both their size and exact position so the cabinet layout does not interfere with openings, trim, heating equipment, or other permanent features.
1. Measure Doors
For each doorway, record:
- Door opening width and height
- Outside-to-outside dimensions of the door casing or trim
- Distance from the nearest finished corner to the outside edge of the trim
- Door swing direction
- Hinge side
- Any nearby light switches, outlets, vents, or trim that could affect cabinet placement
Draw the door swing on your floor plan. This helps identify areas where cabinet doors, drawers, appliance doors, or countertops could interfere with the room door.
If the kitchen has a pocket door, sliding door, or opening without a hinged door, mark that clearly instead of drawing a standard door swing.
2. Measure Windows
For every window, record:
- Window opening width and height
- Outside-to-outside width and height of the casing or trim
- Distance from the nearest finished corner to the window trim
- Height from the finished floor to the bottom of the window sill
- Height from the finished floor to the top of the window trim
- Depth or projection of the sill if it extends into the room
The sill height is especially important when planning base cabinets, countertops, sinks, or appliances below a window.
Do not assume two windows that look identical have exactly the same dimensions. Measure each opening separately.
3. Record Trim and Molding
Door and window casing can take up wall space that is easy to miss when measuring only the opening itself.
Record the width and projection of trim where cabinets will be installed close to a door or window. Also note decorative molding, chair rails, baseboards, wall panels, or other finishes that may affect how closely a cabinet, filler, or countertop can fit against the wall.
You do not need to decide now whether the trim will stay or be removed. Simply mark the existing condition on the measurement plan.
4. Measure Other Fixed Obstacles
Mark and measure any permanent feature that could affect the cabinet layout, including:
- Baseboard heaters
- Radiators
- Floor and wall vents
- Columns
- Wall niches
- Access panels
- Exposed pipes
- Electrical panels
- Structural posts
- Beams or bulkheads
- Thermostats or controls that cannot easily be relocated
For each obstacle, record its width, height, depth or projection, and distance from the nearest corner.
If you are unsure whether an item will remain during the remodel, mark it anyway and note that its final status still needs to be confirmed.
5. Check Cabinet Clearance Around Openings
After recording doors, windows, and obstacles, review the nearby cabinet areas on your floor plan.
Check that:
- Room doors can open fully.
- Cabinet doors and drawers will not hit door or window trim.
- Appliance doors will have enough room to open.
- Countertops will not extend into a doorway.
- Base cabinets will not block heating equipment or vents.
- Window sills will not conflict with the planned countertop height.
- Tall cabinets will not cover switches, controls, or access panels.
- Fillers or side panels have been considered where cabinets meet walls or trim.
If a cabinet will be installed very close to an opening, record the actual available wall space rather than assuming a standard cabinet width will fit.
6. Verify the Opening Measurements
Before moving on to appliances, compare the dimensions on your drawing with the actual room.
Make sure every door, window, and fixed obstacle has:
- A width
- A height where relevant
- A distance from a fixed corner
- Trim dimensions where applicable
- A clearly marked position on the floor plan
Planning tip: Use the finished corner and finished floor as consistent reference points. Avoid measuring one feature from the wall, another from the trim, and another from a nearby cabinet unless the reference point is clearly labeled.
Accurate opening measurements become especially important when choosing cabinet widths near windows, doors, and corners. Standard cabinet dimensions are useful for planning, but the final cabinet size must still fit the actual usable wall space.
5. Appliances and Utilities: Record Critical Dimensions
Appliance measurements affect cabinet widths, countertop openings, filler requirements, door clearance, ventilation, and utility placement. Do not plan around a “standard” appliance size if the actual model has already been selected. Use the manufacturer’s specification or installation sheet whenever possible.
For each appliance, record both the appliance dimensions and the space required for installation. These are not always the same.
1. Create an Appliance Measurement List
Before finalizing the cabinet layout, collect the model number and specification sheet for every appliance that will remain or be installed in the new kitchen.
Record:
- Appliance brand and model number
- Overall width
- Overall height
- Overall depth
- Required installation opening
- Manufacturer-required side, top, rear, or ventilation clearances
- Door or drawer swing
- Handle projection
- Water, gas, electrical, or ventilation connection requirements
If you have not selected the exact appliance yet, mark the planned location on the floor plan but do not assume the final opening size until the appliance specifications are confirmed.
2. Use This Appliance Measurement Table
| Appliance | Model Number | Width | Height | Depth | Required Opening / Clearance | Utility Notes |
|---|---|---|---|---|---|---|
| Refrigerator | Check manufacturer specifications | Water line / outlet if required | ||||
| Range / Oven | Check manufacturer specifications | Gas or electrical connection | ||||
| Dishwasher | Check manufacturer specifications | Water, drain, and electrical | ||||
| Microwave | Check installation type and specs | Outlet / ventilation if required | ||||
| Range Hood | Follow hood and cooking-appliance specifications | Duct and electrical location | ||||
| Wall Oven | Confirm cabinet cutout requirements | Dedicated electrical connection | ||||
| Cooktop | Confirm countertop cutout and clearances | Gas or electrical connection |
3. Measure Refrigerator Space Carefully
For a refrigerator, measure the available opening width, height, and depth, but also check how the doors open.
Record:
- Wall-to-wall or cabinet-to-cabinet opening width
- Finished floor to cabinet or ceiling height
- Available depth
- Door swing direction
- Clearance needed for handles and hinges
- Distance to nearby walls, tall cabinets, or countertops
- Water-line and electrical-outlet locations, if applicable
A refrigerator may physically fit inside an opening but still have restricted door or drawer movement if it is too close to a side wall or adjacent cabinet. Always compare the room measurements with the exact appliance installation specifications.
4. Measure the Range, Cooktop, Oven, and Hood Together
Cooking appliances should be planned as one coordinated area because the range or cooktop, countertop, wall cabinets, hood, electrical supply, gas connection, and ventilation may all affect one another.
Record the exact dimensions and installation requirements for the range, cooktop, or wall oven. For a cooktop, also record the manufacturer’s required countertop cutout.
For the range hood, note:
- Hood width and depth
- Installation height specified for the selected hood and cooking appliance
- Duct size and direction
- Electrical connection location
- Any cabinet or enclosure required around the hood
Do not use one universal hood-to-cooktop distance. Installation height varies by hood type, manufacturer, and cooking appliance, so follow the specifications supplied with the products.
5. Measure Dishwasher and Sink Connections
If a dishwasher is part of the layout, record its exact opening requirements and the location of nearby plumbing and electrical connections.
Check:
- Dishwasher width, height, and depth
- Required installation opening
- Distance to the sink cabinet
- Water-supply location
- Drain routing
- Electrical connection
- Door clearance when fully opened
Do not automatically add extra inches around the dishwasher unless the manufacturer specifies them. The cabinet opening should be planned from the actual appliance installation requirements.
If you are planning a farmhouse or apron-front sink, check our farmhouse sink cabinet size guide before finalizing the sink base cabinet so you can compare the sink width, minimum cabinet requirement, and usable cabinet opening.
6. Mark All Utility Locations
On the floor plan, measure utility locations from a fixed reference point such as the nearest finished corner.
Record:
- Sink hot- and cold-water supplies
- Sink drain
- Dishwasher water and drain connections
- Refrigerator water line
- Gas connection
- Standard electrical outlets
- Dedicated appliance outlets
- Range or cooktop electrical connection
- Microwave outlet
- Hood electrical connection
- Hood duct or wall/ceiling vent location
For each connection, note both the horizontal distance from the nearest corner and the height above the finished floor where relevant.
Do not simply write “outlet near refrigerator.” A designer needs to know exactly where the connection is located and whether a cabinet panel, drawer, appliance, or back panel could interfere with it.
7.Check Appliance Door and Drawer Clearances
Appliance dimensions alone do not show how much space the appliance needs during everyday use.
Check whether:
- Refrigerator doors can open far enough to access drawers and shelves.
- Oven doors can open without blocking a walkway or island.
- Dishwasher doors can open without hitting the opposite cabinets or island.
- Microwave doors do not interfere with nearby cabinet doors.
- Appliance handles do not collide with adjacent walls or cabinets.
- Corner cabinets and nearby drawers can still operate when appliance doors are open.
If the appliance is close to a corner or wall, include that condition in your photos and floor plan.
8.Verify Appliance Specifications Before Ordering Cabinets
Before the cabinet order is finalized, compare the kitchen measurements with the latest specification sheets for the actual appliances.
Check that you have confirmed:
- Appliance model numbers
- Overall appliance dimensions
- Required cabinet or countertop opening
- Manufacturer-required clearances
- Door and drawer movement
- Plumbing locations
- Gas locations
- Electrical requirements
- Ventilation or duct requirements
Planning tip: If an appliance model changes after the cabinet layout is completed, recheck the surrounding cabinet dimensions before ordering. Two appliances sold under the same nominal size can still have different installation, ventilation, or door-clearance requirements.
6. Cabinet Placement: Understand the Key Measurements
Once the room, appliances, utilities, doors, and windows are measured, you can begin checking how the cabinet layout will fit within the available space. Standard cabinet dimensions are useful as a starting point, but the final layout should always be based on the actual room measurements and the exact cabinet collection you plan to order.
1. Use Standard Cabinet Sizes as a Planning Reference
Common kitchen cabinet dimensions can help you estimate how much storage will fit along each wall.
Typical planning dimensions include:
- Base cabinets: commonly 34.5″ high and 24″ deep before the countertop
- Wall cabinets: commonly 12″ deep, with 30″, 36″, and 42″ heights frequently available
- Tall or pantry cabinets: commonly available in 84″, 90″, and 96″ heights
- Specialty cabinets: dimensions vary depending on the appliance, corner, sink, or storage function
These dimensions are not universal. Widths, depths, fillers, panels, specialty cabinets, and installation requirements vary by manufacturer and cabinet collection. Your existing kitchen cabinet size guide already explains these dimensions in more detail, so we do not need to repeat another large size table here.
2. Measure From Finished Surfaces
When checking cabinet placement, use finished walls, finished floors, countertops, panels, and other completed surfaces as your reference whenever possible.
Do not calculate the layout only from rough framing or wall-to-wall dimensions if the finished space will also include:
- Wall trim or casing
- Fillers
- Finished end panels
- Countertop overhang
- Backsplash
- Crown molding
- Appliance panels
- Decorative side panels
These components can change the final installed width or depth of a cabinet run.
3. Check the Finished Aisle Space
If the kitchen includes parallel cabinet runs, a peninsula, or an island, measure the clear space between the finished cabinet or countertop edges rather than measuring only from the walls.
When reviewing the aisle, consider:
- Countertop overhang
- Cabinet and drawer fronts
- Appliance handles
- Refrigerator doors
- Oven doors
- Dishwasher doors
- Opposing drawers
- Seating, if the island or peninsula includes stools
Do not rely on one universal walkway dimension for every kitchen. The amount of space needed depends on the layout, appliance operation, traffic pattern, number of users, and whether the aisle is primarily for walking or active kitchen work.
Planning tip: Draw the finished cabinet and countertop edges on your floor plan so the remaining aisle width is easy to see.
4. Plan for Fillers and Corner Clearances
Cabinet-box widths alone do not always equal the total installed width of the cabinet run.
Fillers or spacing may be needed where cabinets meet:
- Side walls
- Inside corners
- Tall cabinets
- Refrigerators
- Dishwashers
- Door or window trim
- Uneven walls
Fillers can provide room for cabinet doors, drawers, and hardware to operate without hitting an adjacent wall or cabinet.
At corners, check both cabinet runs together. A cabinet may fit the wall measurement but still create a door, drawer, or handle conflict with the cabinet on the adjoining wall.
Do not choose filler widths from a general rule alone. Use the exact cabinet design, door style, hardware, wall condition, and manufacturer specifications to determine what is required.
5. Plan Sink Placement Around the Full Layout
A sink does not have to be centered under a window.
When selecting the sink location, consider:
- Existing drain and water-supply locations
- Sink-base cabinet width
- Window position and sill height
- Dishwasher location
- Countertop workspace
- Trash or recycling storage
- Nearby drawers and cabinet doors
- Lighting
- Overall workflow
A sink under a window can work well in many kitchens, but it should only be used when the room dimensions, plumbing, countertop, and cabinet layout support it.
If the sink location is changing, mark both the existing plumbing and the proposed sink position on the floor plan so any plumbing changes can be identified before cabinets are ordered.
6. Check Wall Cabinet Placement
Wall cabinets should be planned together with the countertop, appliances, windows, range hood, microwave, refrigerator cabinet, and ceiling height.
About 18″ between the countertop and standard wall cabinets is common in many kitchen layouts, but it should be treated as a planning reference rather than a universal requirement. Your final spacing may change because of:
- Countertop thickness
- Backsplash design
- Appliance requirements
- Range hood or microwave installation
- Window height
- Wall-cabinet height
- Ceiling height
- Crown molding or trim
Always verify appliance-specific clearances separately before finalizing the wall-cabinet layout. Your existing cabinet size guide also treats the 18″ dimension as a common planning reference rather than a fixed universal rule.
7. Check Tall Cabinets and Refrigerator Cabinets
Tall pantry cabinets and refrigerator cabinets should be planned as part of the complete cabinet run.
Before choosing their height and width, check:
- Finished ceiling height
- Adjacent wall-cabinet height
- Refrigerator dimensions
- Refrigerator door swing
- Appliance panels
- Fillers
- Crown molding or top trim
- Installation clearance
- Nearby walls and doorways
Do not choose an 84″, 90″, or 96″ tall cabinet based only on the ceiling height. The cabinet still needs enough room for installation and should align properly with the surrounding cabinetry.
8. Tape Out the Layout Before Ordering
Painter’s tape can be useful for testing the cabinet footprint before the final order.
Mark the approximate finished edges of:
- Base cabinet runs
- Island or peninsula
- Refrigerator
- Range
- Dishwasher
- Major appliance doors
- Seating areas
Then walk through the space and check whether the layout feels practical.
Pay particular attention to areas where:
- Two people may pass each other
- Appliance doors open into the aisle
- Island seating faces another cabinet run
- Drawers open opposite other drawers
- A refrigerator or oven is close to a wall
- A cabinet run turns a corner
Tape does not replace exact measurements, but it can make obvious clearance conflicts easier to notice before cabinets arrive.
9. Verify the Complete Cabinet Run
Before moving on, calculate the full planned width of each cabinet run.
Include:
- Every cabinet width
- Fillers
- Finished panels
- Appliance openings
- Refrigerator panels
- Corner allowances
- Trim where applicable
Then compare that total with the actual usable wall measurement.
Check that:
- The complete cabinet run fits the available wall.
- Appliance openings match the selected appliance specifications.
- Doors and drawers have room to operate.
- Corners have enough clearance.
- Countertop overhang has been considered.
- Island or peninsula spacing has been checked.
- Plumbing and electrical locations still work with the proposed cabinets.
Planning tip: If the calculated cabinet run uses every fraction of available wall space with no allowance for uneven walls, fillers, or installation adjustment, review the layout again before ordering.
7. Common Measurement Mistakes and How to Avoid Them
Most kitchen measurement problems do not come from complicated calculations. They usually happen because a dimension was missed, taken from the wrong reference point, or recorded without considering trim, appliances, utilities, or how cabinets will actually open.
Use the table below to check your measurements before moving on to cabinet selection and design.
| Common Mistake | Why It Causes Problems | How to Avoid It |
|---|---|---|
| Measuring a critical dimension only once | A recording or reading error may go unnoticed until the cabinet layout is created | Recheck important wall lengths, openings, appliance spaces, and utility locations before finalizing the plan |
| Measuring only the total wall length | The designer cannot tell exactly where doors, windows, appliances, and obstacles are positioned | Record both the full wall length and the smaller sections between fixed features |
| Ignoring trim and finished surfaces | Door casing, window trim, baseboards, panels, and countertop overhangs can reduce usable space | Measure from clearly identified finished surfaces and record trim dimensions separately |
| Measuring ceiling height in only one location | A sloped or uneven ceiling can affect tall cabinets, wall cabinets, fillers, and crown molding | Measure floor-to-ceiling height at several points along the cabinet walls |
| Assuming walls and corners are perfectly straight or square | Cabinet runs may fit on paper but require fillers, scribing, or installation adjustments in the actual room | Note noticeably bowed walls, uneven corners, and dimensional differences rather than assuming the room is perfectly rectangular |
| Planning around a “standard” appliance size | Two appliances with similar advertised widths can have different openings, door swings, handles, and ventilation requirements | Use the specification sheet for the actual appliance model whenever possible |
| Forgetting plumbing, electrical, gas, or ventilation locations | A cabinet, drawer, shelf, or appliance may interfere with an existing utility connection | Measure each connection from a fixed corner and record its height above the finished floor where relevant |
| Forgetting fillers and finished panels | The total cabinet-box widths may fit the wall while the complete installed cabinet run does not | Include fillers, panels, appliance openings, corner allowances, and trim when calculating the total cabinet run |
| Measuring from inconsistent reference points | Dimensions become difficult for a designer or installer to interpret correctly | Use the same finished corners and finished floor as reference points and label any exceptions clearly |
| Relying only on a sketch without photos | Unusual wall conditions, utilities, trim, or obstacles may not be obvious from dimensions alone | Take clear photos of every wall and detailed photos of unusual conditions |
Quick Error Check Before You Move On
Before considering the kitchen measurements complete, compare the drawing with the actual room one more time.
Confirm that:
- Every wall has a full measurement.
- Smaller wall sections are recorded.
- Doors and windows include their positions and trim.
- Ceiling heights were checked at multiple points.
- Appliances have model numbers or specification sheets where available.
- Plumbing, electrical, gas, and ventilation locations are marked.
- Soffits, columns, vents, radiators, and other obstacles are included.
- Fillers and finished panels have been considered in the planned cabinet runs.
- Appliance, cabinet, and room doors have enough space to operate.
- Photos match the wall labels used on the floor plan.
If two measurements do not agree, do not simply average them. Measure the area again and identify why the dimensions are different. The difference may come from an uneven wall, trim, an incorrect reference point, or a simple recording error.
Planning tip: Keep the original measurements on your drawing even if the room is not perfectly square or level. Your goal is to document the actual space accurately, not to make the measurements look cleaner on paper.
8. Measurement Tips for More Accurate Cabinet Planning
Once the basic measurements are complete, a few additional checks can make the floor plan easier to review and reduce uncertainty before cabinet design begins. The goal is not to create a construction drawing, but to document the existing room clearly and consistently.
1. Use a Level or Laser Level as a Reference
A level or laser level can help identify noticeable changes in floors, ceilings, walls, and long cabinet runs.
Use it to check areas such as:
- Floor level along a planned base-cabinet run
- Ceiling height across a wall
- Tall-cabinet locations
- Long walls where cabinets need to align
- Areas close to soffits, beams, or ceiling transitions
If you notice a significant variation, record where it occurs rather than trying to correct the measurement on paper. The installer or designer can then determine whether fillers, scribing, shimming, or other adjustments may be needed.
2. Cross-Check the Room Geometry
For rectangular or nearly rectangular areas, diagonal measurements can be useful as an additional check.
Measure from one corner to the opposite corner, then repeat across the other diagonal. If the measurements are different, record both values and note that the room may not be perfectly square.
Do not rely on a fixed difference such as 1/4″ to decide whether the room is acceptable. The effect of an out-of-square condition depends on where the cabinets are installed, the length of the cabinet run, corner conditions, fillers, countertops, and the installation method.
3. Use Consistent Units and Labels
Choose one measurement format and use it throughout the entire plan.
For example:
- Label walls as Wall A, Wall B, Wall C, and so on.
- Label windows and doors if there is more than one.
- Record measurements consistently in inches or feet and inches.
- Write fractions clearly.
- Match photo names or notes to the same wall labels used on the drawing.
A measurement such as “36 1/2″ from Wall A corner to Window 1 trim” is much easier to interpret than an unlabeled number written beside the sketch.
4. Measure From Fixed Reference Points
Whenever possible, measure openings, utilities, and obstacles from a finished corner or finished floor rather than from another movable or temporary item.
For example, instead of recording that an outlet is “next to the refrigerator,” record its distance from the nearest finished corner and its height above the finished floor.
Using consistent reference points makes the floor plan easier to understand even if the existing cabinets or appliances are later removed.
5. Keep Photos With the Measurements
Take at least one clear wide photo of every wall and additional close-up photos of unusual conditions.
Useful photos include:
- Plumbing connections
- Electrical outlets
- Gas connections
- Hood ducts
- Soffits and beams
- Uneven walls
- Window and door trim
- Appliance openings
- Corners where cabinet runs meet
Keep the photos together with the floor plan so someone reviewing the measurements can compare the drawing with the actual room.
6. Keep Appliance Specifications With the Floor Plan
If appliance models have already been selected, save the specification or installation sheets with your kitchen measurements.
This is especially important for:
- Refrigerators
- Ranges
- Cooktops
- Wall ovens
- Dishwashers
- Microwaves
- Range hoods
If an appliance changes later, mark that change clearly and recheck the surrounding cabinet opening before the cabinet order is finalized.
7. Clearly Mark Measurements That Still Need Verification
If you cannot safely reach a measurement, an appliance has not been selected, or part of the room will change during remodeling, do not guess.
Write a note such as:
TO VERIFY
beside the dimension or item.
Examples include:
- Final appliance model not selected
- Existing flooring will be replaced
- Soffit may be removed
- Plumbing may be relocated
- Wall may be opened or moved
- Final countertop thickness not selected
A clearly marked unknown dimension is more useful than an estimated number that may later be mistaken for a confirmed measurement.
8. Keep an Original Copy of Your Measurements
Before making layout revisions, save or photograph the original measurement sheet.
Keep:
- Original room measurements
- Updated cabinet layout
- Appliance specifications
- Kitchen photos
- Notes about proposed plumbing or electrical changes
This makes it easier to tell the difference between the existing room dimensions and the proposed cabinet design dimensions later in the project.
Before sending the measurements for cabinet design, review the drawing one more time and make sure every number can be traced to a specific wall, opening, appliance, utility, or obstacle. Clear documentation is just as important as taking the measurement itself.
9. Templates and Digital Tools to Simplify Measuring
A measuring template or digital floor-plan tool can make it easier to organize room dimensions, but these tools should support—not replace—careful manual measurements. The most important information is still the actual wall lengths, openings, appliance specifications, utility locations, ceiling heights, and fixed obstacles in your kitchen.
1. Start With a Kitchen Measurement Form
If you prefer a structured worksheet instead of starting with blank graph paper, use a kitchen measurement form to record the room dimensions and project information in one place.
RARA’s kitchen measurement form can be used to organize your measurements before submitting them for cabinet design.
Use the form together with your floor-plan sketch and kitchen photos. The form helps organize the information, while the drawing shows where each measurement belongs. RARA’s current measurement submission page also accepts project details for the design process.
2. Use Graph Paper for a Simple Scaled Drawing
Graph paper is still one of the easiest ways to create a basic kitchen floor plan.
Choose one scale and use it consistently throughout the drawing. For example, you can use:
1 square = 6 inches
Then mark:
- Wall lengths
- Doors and windows
- Appliances
- Plumbing
- Electrical connections
- Gas connections
- Ventilation
- Soffits and other fixed obstacles
Write the scale directly on the page so anyone reviewing the drawing knows how to interpret it.
You may want to keep one clean original copy and use additional copies when testing different cabinet layouts.
3. Digital Floor-Plan Tools Are Optional
A phone, tablet, floor-plan app, or digital drawing program can be useful if you prefer to organize the room electronically.
Digital tools may help you:
- Create a cleaner floor-plan drawing
- Add labels and notes
- Organize photos with room measurements
- Test different cabinet layouts
- Share the plan with a cabinet designer or contractor
However, do not assume a phone-based or camera-based measurement is automatically accurate enough for the final cabinet order.
4. Verify Digital Measurements Manually
Before using dimensions from a digital or AR-based measurement tool for cabinet ordering, verify critical dimensions with a tape measure or laser distance measurer.
Always manually confirm:
- Full wall lengths
- Door and window positions
- Appliance openings
- Ceiling heights
- Sink and plumbing locations
- Gas and electrical locations
- Cabinet-run dimensions
- Island or peninsula clearances
Planning tip: Digital tools are most useful for organizing and visualizing measurements. The final cabinet layout should still be based on verified room and appliance dimensions.
5. Keep All Measurement Files Together
Create one folder for the entire kitchen measurement package.
Include:
- Floor-plan sketch
- Measurement form
- Kitchen photos
- Appliance model numbers
- Appliance specification sheets
- Notes about plumbing or electrical changes
- Measurements that still need verification
- Revised layout drawings
Name photos and documents clearly so they correspond with the wall labels on your floor plan.
For example:
Wall A – Sink and Window
Wall B – Refrigerator Opening
Wall C – Range and Hood
This makes it easier for a cabinet designer or installer to understand the room without having to guess which photo belongs to which measurement.
A clear hand-drawn plan with verified measurements is usually more useful than a sophisticated digital drawing with incomplete or estimated dimensions. Choose whichever tools make the process easier for you, but keep the final measurements consistent, clearly labeled, and easy to verify.
10.Final Pre-Order Checklist: Double-Check Everything
Before submitting your measurements for cabinet design or placing a cabinet order, review the entire measurement package one final time. The goal is to make sure every cabinet run, opening, appliance, and fixed feature can be traced back to a verified room dimension.
1. Confirm Every Wall Measurement
Check that every wall has:
- A full finished wall length
- Smaller section measurements between openings and fixed features
- A clear wall label that matches your floor plan
- Any angled, bowed, or unusual wall conditions noted
If two measurements do not agree, measure the area again rather than averaging the numbers.
2. Verify Ceiling Heights
Confirm the finished floor-to-ceiling height at multiple points along the cabinet walls.
Also check whether the room includes:
- Soffits
- Bulkheads
- Beams
- Dropped ceilings
- Sloped ceilings
- Crown molding or other planned top trim
If the flooring will change during the remodel, clearly note that the final finished-floor height still needs to be confirmed.
3. Recheck Doors and Windows
For every door and window, confirm:
- Opening width and height
- Trim or casing dimensions
- Distance from the nearest finished corner
- Window sill height
- Door swing direction
- Any nearby switches, outlets, vents, or obstacles
Make sure nearby cabinets, drawers, countertops, and appliances will not interfere with the opening or trim.
4. Confirm Appliance Specifications
For every appliance that has already been selected, check the latest manufacturer specification or installation sheet.
Verify:
- Model number
- Overall width, height, and depth
- Required installation opening
- Manufacturer-required clearances
- Door or drawer swing
- Handle projection
- Plumbing requirements
- Gas or electrical requirements
- Ventilation requirements
If the appliance model has changed since the layout was created, recheck the surrounding cabinet dimensions before ordering.
5. Verify Plumbing and Utility Locations
Confirm that the floor plan clearly shows the location of:
- Sink water supplies
- Sink drain
- Dishwasher connections
- Refrigerator water line
- Gas connection
- Electrical outlets
- Dedicated appliance connections
- Range hood electrical connection
- Ventilation or duct locations
Where relevant, record both the horizontal distance from a finished corner and the height above the finished floor.
6. Confirm the Complete Cabinet Run
Do not add up cabinet widths alone.
For each cabinet run, include:
- Cabinet widths
- Fillers
- Finished end panels
- Appliance openings
- Refrigerator panels
- Corner allowances
- Decorative panels
- Trim where applicable
Then compare the total planned width with the actual usable wall measurement.
7. Check Cabinet, Drawer, and Appliance Operation
Review areas where doors or drawers may compete for the same space.
Confirm that:
- Cabinet doors can open without hitting walls or trim.
- Drawers can open without hitting adjacent hardware.
- Corner cabinets have enough operating clearance.
- Refrigerator doors can open sufficiently for normal use.
- Dishwasher and oven doors can open into the aisle.
- Opposing cabinets or drawers do not create obvious conflicts.
- Tall cabinets do not block switches, controls, or access panels.
8. Review Island and Peninsula Clearances
If the kitchen includes an island or peninsula, measure from the finished countertop or cabinet edge, not only from the cabinet box or wall.
Check:
- Walkway space
- Work-aisle space
- Appliance doors
- Opposing drawers
- Seating
- Countertop overhang
- Traffic paths
If useful, tape the approximate finished footprint on the floor and walk through the space again before finalizing the layout.
9. Check Fillers and Finished Panels
Make sure fillers or finished panels have been considered wherever cabinets meet:
- Walls
- Corners
- Refrigerators
- Tall cabinets
- Doors or windows
- Uneven surfaces
Do not assume the cabinet boxes can use the entire available wall width.
10. Match Photos to the Floor Plan
Make sure you have at least one clear photo of every wall.
For unusual areas, include close-up photos of:
- Plumbing
- Electrical connections
- Gas connections
- Ventilation
- Soffits
- Beams
- Uneven walls
- Appliance openings
- Window and door trim
- Difficult corners
Use the same wall labels in the photos and floor plan whenever possible.
11. Identify Anything That Is Still Unconfirmed
Before submitting the measurements, look for notes marked:
TO VERIFY
Examples may include:
- Appliance model not selected
- Flooring will change
- Soffit may be removed
- Plumbing may move
- Wall may be removed or relocated
- Countertop thickness not selected
- Final cabinet collection not confirmed
Do not replace an unknown dimension with an estimate just to make the plan look complete.
12. Keep the Complete Measurement Package Together
Your final measurement package should include:
- Floor plan
- Wall measurements
- Door and window measurements
- Appliance specifications
- Plumbing and utility locations
- Kitchen photos
- Notes about proposed remodeling changes
- Any dimensions still requiring verification
Keep an original copy of your room measurements separate from later cabinet-layout revisions.
Final Check
Before ordering, ask yourself:
- Can every number on the drawing be traced to a specific location?
- Are the measurements taken from clearly identified reference points?
- Are all appliances and utilities accounted for?
- Does the complete cabinet run fit the actual usable wall space?
- Are there any dimensions that still depend on future remodeling work?
- Has anything changed since the kitchen was originally measured?
If the answer to any of these questions is unclear, verify that item before the cabinet order is finalized.
Planning tip: Your measurement drawing does not need to look professional. Accurate, clearly labeled information is more valuable than a polished floor plan with missing or estimated dimensions.
11.Frequently Asked Questions About Measuring Your Kitchen
What measurements do I need for kitchen cabinets?
For an initial kitchen cabinet layout, record the full length of every wall, ceiling height, doors and windows, appliance locations, plumbing, electrical connections, gas connections, ventilation, soffits, columns, and other fixed obstacles.
You should also record smaller wall sections between openings and fixed features rather than providing only the overall room dimensions.
If appliances have already been selected, include their model numbers and manufacturer specification sheets so the cabinet layout can be planned around the actual installation requirements.
Should I measure my kitchen before or after choosing appliances?
You can take the main room measurements before choosing appliances, but the exact appliance models should ideally be confirmed before the final cabinet order.
Refrigerators, ranges, dishwashers, wall ovens, cooktops, microwaves, and range hoods may have different opening, clearance, ventilation, plumbing, and electrical requirements even when their advertised sizes appear similar.
If you change an appliance after the cabinet layout has been completed, recheck the surrounding cabinet dimensions before ordering.
Can I measure my kitchen myself?
Yes. A homeowner can usually collect the basic measurements needed for an initial cabinet design using a tape measure, floor-plan sketch, photos, and appliance specifications.
A second person can be helpful when measuring long walls, ceiling heights, or difficult-to-reach areas.
For complex rooms, major structural changes, unusual walls, or measurements you are not confident about, mark the uncertain dimensions clearly and have them verified before the final cabinet order.
What if my walls, floors, or ceilings are not perfectly level or square?
Do not change the measurements to make the room appear square or level on your drawing. Record the actual dimensions and note where the variation occurs.
Measure ceiling height at multiple points, note noticeably uneven walls or corners, and record different measurements separately rather than averaging them.
These conditions may affect fillers, panels, countertop fitting, tall cabinets, and installation adjustments, so they should be visible on the measurement plan before the cabinet layout is finalized.
Should I include baseboards, door trim, window trim, and crown molding?
Yes. Record any trim or molding that could affect the usable space around the cabinets.
For doors and windows, record both the opening and the outside dimensions of the casing or trim. Also note baseboards, decorative wall molding, crown molding, and other finishes located close to the planned cabinet runs.
If some trim will be removed during remodeling, mark that clearly instead of simply leaving it off the existing-room measurements.
Which measurements are most important when ordering kitchen cabinets?
Wall width, ceiling height, cabinet depth, appliance openings, doors and windows, and utility locations all affect the final layout. No single measurement should be treated as the only important one.
A cabinet run may fit the wall width but still fail to work properly if a refrigerator cannot open, a window sill conflicts with the countertop, plumbing falls behind a drawer, or a tall cabinet does not have enough vertical installation space.
The safest approach is to review the complete room rather than checking cabinet width alone.
How should I double-check my kitchen measurements?
Review the room systematically using the same wall labels and reference points from your original drawing.
Confirm:
- Full wall lengths
- Smaller wall sections
- Ceiling heights
- Door and window locations
- Appliance openings
- Plumbing locations
- Electrical and gas connections
- Ventilation
- Soffits and other obstacles
- Complete cabinet-run dimensions
If two measurements do not agree, measure that area again and identify the reason for the difference rather than averaging the numbers.
Do I need a professional floor plan to order kitchen cabinets?
Not necessarily for the initial design stage. A clear hand-drawn floor plan can be useful if the measurements are accurate, clearly labeled, and supported by photos.
The drawing should show where every wall, opening, appliance, utility, and obstacle is located. A simple plan with complete information is more useful than a polished drawing that leaves out critical dimensions.
Before final ordering, however, any critical or uncertain measurements should be verified.
How do I measure a kitchen with an island or peninsula?
Measure the room and surrounding cabinet runs first, then record the proposed island or peninsula location separately.
Include the finished cabinet or countertop dimensions and check the remaining space around:
- Appliance doors
- Cabinet doors and drawers
- Seating
- Walkways
- Opposing cabinet runs
- Refrigerator and oven doors
Do not calculate the available aisle only from cabinet-box dimensions if the finished countertop will project farther into the space.
What should I send to a cabinet designer?
A useful kitchen measurement package should include:
- A labeled floor-plan sketch
- Wall and ceiling measurements
- Door and window dimensions
- Appliance model numbers and specifications
- Plumbing locations
- Electrical, gas, and ventilation locations
- Photos of every wall
- Photos of unusual obstacles or room conditions
- Notes about walls, flooring, soffits, or utilities that may change during remodeling
Clearly mark anything that still needs to be verified so estimated dimensions are not mistaken for confirmed measurements.
12.Conclusion: Verify Your Measurements Before Ordering Cabinets
Accurate kitchen measurements give you the information needed to build a cabinet layout around the actual room rather than assumptions. Before ordering, make sure your floor plan includes the wall dimensions, ceiling heights, doors and windows, appliances, plumbing, electrical connections, ventilation, fixed obstacles, and any measurements that still need to be verified.
The most important step is to review the complete layout as a system. A cabinet may fit the available wall width but still create problems if an appliance cannot open properly, plumbing conflicts with drawers, a window is too low for the planned countertop, or fillers and finished panels were not included in the cabinet run.
Once the room measurements and appliance specifications are confirmed, you can compare cabinet options based on your preferred installation method. Explore our pre-assembled kitchen cabinets if you prefer cabinets delivered assembled, or browse our RTA kitchen cabinets if you plan to assemble the cabinets before installation.


About author

Related posts

Some kitchen trends come and go, but Shaker cabinets have remained a staple in American kitchens for generations. Known for their simple recessed-panel doors and... Continue reading

This kitchen cabinet buying guide explains what to look for before you buy, including cabinet construction, materials, layout, storage, cost, finishes, and installation. Cabinets often... Continue reading
If you’re planning a kitchen upgrade, this is probably your first question:“How much should I really spend on cabinets?” And I’ll be honest with you—there’s... Continue reading

Bathroom color trends in 2026 are moving toward warmer, more natural palettes rather than stark white and cool gray alone. Light neutrals remain the safest... Continue reading

Last Updated: August 26, 2026 Kitchen cabinet cost in 2026 can range from about $50 to $900+ per linear foot for cabinets alone, while installed... Continue reading





Add comment