No products in the cart.
Return To Shop.png?sharp=1)


Ultimate Kitchen Cabinets Guide: Read Before You Buy
This kitchen cabinet buying guide explains what to look for before you buy, including cabinet construction, materials, layout, storage, cost, finishes, and installation.
Cabinets often eat up 30–40% of a kitchen remodel budget, yet many homeowners regret their choice just a few years later—either because they overspent or because the cabinets started warping, peeling, or trapping moisture.
This guide skips the boring theory and focuses on real-world decisions. It combines 20 years of insights from U.S. kitchen designer Mark Tobin, NKBA planning principles, Houzz remodeling trends, Lowe’s material recommendations, and lessons from real DIY remodels.
You’ll learn how to choose cabinets based on what actually matters:
space planning → family lifestyle → budget strategy → material durability → moisture protection → long-term home value.
Short on budget? The Budget Matrix in Chapter 1 will help you spend smarter. Living in a humid or coastal area? Chapter 4’s moisture protection tips are essential. Have kids, pets, or a busy kitchen? We’ll show you which cabinet materials and finishes truly hold up over time.
Whether you’re remodeling a forever home or upgrading for resale, this guide will help you avoid expensive mistakes and build a kitchen that works for real life.
What to Look for When Buying Kitchen Cabinets
Before comparing colors and door styles, check the features that affect how your cabinets will perform every day:
- Cabinet construction: Compare plywood, MDF, particleboard, panel thickness, and back-panel construction.
- Hardware quality: Look for durable hinges, full-extension drawer slides, and soft-close hardware in high-use areas.
- Layout and dimensions: Make sure cabinet sizes, appliance clearances, fillers, and walkways work with your actual kitchen.
- Finish durability: Consider moisture resistance, scratch resistance, cleaning, and how the finish will hold up to daily use.
- Storage: Choose drawers, shelves, pantry cabinets, and organizers based on what you actually store and use.
- Total cost: Compare more than cabinet prices. Include fillers, panels, trim, shipping, assembly, and installation.
- Warranty and replacement support: Check what happens if a door, drawer, or cabinet arrives damaged or needs replacement later.
Then use the sections below to compare each of these factors in more detail before you order.
Table of Contents
Chapter 1
Layout, NKBA Standards & Budget Matrix
Plan Before You Build
1.1 Maximize Your Space: From Sub-floor to Functional Kitchen
A. Plan the Layout Before Demolition
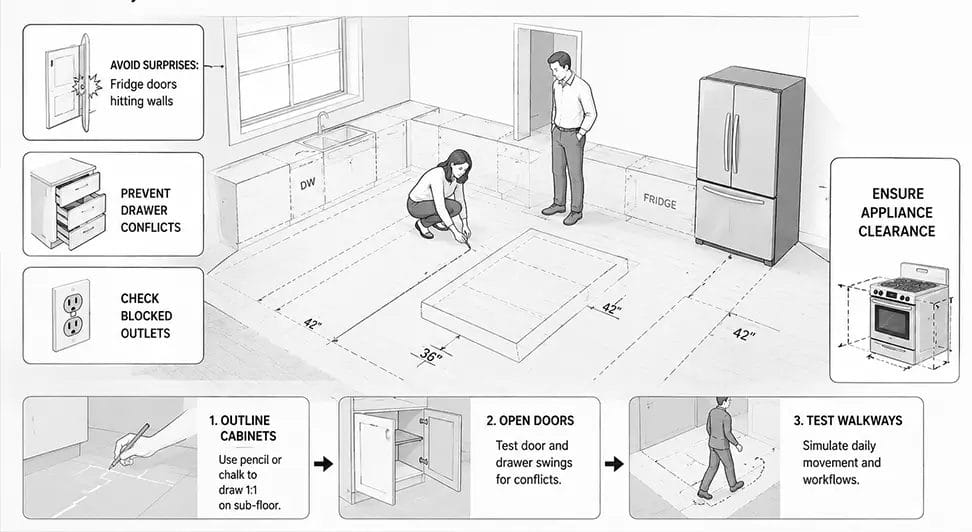
Before tearing out your old kitchen, spend time mapping out your space in 1:1 scale. This helps avoid surprises like fridge doors hitting walls, drawer conflicts, blocked outlets, or appliance clearance problems.
- 1:1 Floor Projection Method: Use pencil or chalk to outline cabinets directly on the sub-floor. Open doors, test walkways, and simulate daily movement before installation begins.
- Base Cabinet Trend – Deep Drawers: Replace traditional shelves with pull-out drawers whenever possible. They improve storage access and reduce strain on your back.
- Wall Cabinet Tip – Go to the Ceiling:
- Small kitchens: extend cabinets to the ceiling for extra storage – see small kitchen cabinet solutions.
- Large kitchens: combine cabinets with open shelving for visual balance.
B. The Realities of Family Life
A beautiful kitchen means nothing if it can’t survive real daily life. Before choosing cabinet styles, ask yourself one simple question:
Do you have kids, pets, or a busy household?
Families with children or pets deal with:
- scratches
- fingerprints
- spills
- grease buildup
- constant cabinet impacts
Because of this, many designers now recommend:
- smooth cabinet surfaces
- easy-clean finishes
- scratch-resistant materials
- anti-fingerprint coatings
Best Practical Choice:
Flat-panel or simple Shaker doors with durable finishes like Thermofoil are often easier to maintain than heavily carved traditional doors.
Avoid:
- deep decorative grooves
- ornate raised-panel doors
- overly detailed trim that traps grease and dust
Modern kitchen design is no longer just about looks. Easy maintenance has become a major trend in U.S. family homes.
1.2 NKBA Standard Dimensions & Clearance Guidelines
| Cabinet Type | Standard Size | Notes / Tips |
|---|---|---|
| Base Cabinets | Height: 36″ (34.5″ cabinet + 1.5″ countertop) Depth: 24″ Toe kick: 4″H x 3″D | Follow NKBA strictly. Deep drawers recommended for high-use cabinets. |
| Wall Cabinets | Depth: 12″ (custom 15″ for built-in microwave) Height: 30″, 36″, 42″ depending on ceiling | Top-to-ceiling for small kitchens; open shelves for large kitchens. |
| Clearance Lines | 18″ – Countertop to bottom of wall cabinet 30–36″ – Range clearance 42–48″ – Walkway width | 18″ allows appliances like coffee machines 36″ over gas stove is safety minimum Single person: 42″; two people: 48″ |
Reader Tip: Always measure twice, and leave extra clearance for comfort and safety. NKBA standards are the industry benchmark for U.S. kitchens.
1.3 Custom vs. RTA Cabinets: How to Save 30–60%
| Cabinet Type | Cost Impact | Pros | Cons |
|---|---|---|---|
| Custom | High | Fully tailored to space; premium materials | Expensive, long lead times |
| Semi-Custom | Medium | Some customization, faster delivery | Less flexibility, higher cost than RTA |
| RTA (Ready-to-Assemble) | Low | Save 30–60% vs. custom; easy shipping; widely available | DIY assembly required; quality varies by brand |
Reader Tip: RTA is the smart choice for mid-range U.S. kitchens. But don’t just chase the lowest price—brand reliability, material quality, and shipping protection matter most.
Before comparing cabinet options, use our cabinet cost calculator to estimate how RTA, semi-custom, and custom cabinetry may affect your starting budget.
1.4 Budget Matrix – Spend Smart, Save Smart
Must Splurge
- Heavy-use hardware (soft-close slides)
- Sink base and load-bearing panels
- Certified eco-friendly materials
Can Save
- Pull-out organizers (DIY later from Amazon)
- Decorative door panels (overly complex carvings)
Resale and Long-Term Value
Before choosing cabinet colors or styles, think about your long-term plan for the house.
Ask yourself:
- Is this your forever home?
- Or will you sell within the next 3–5 years?
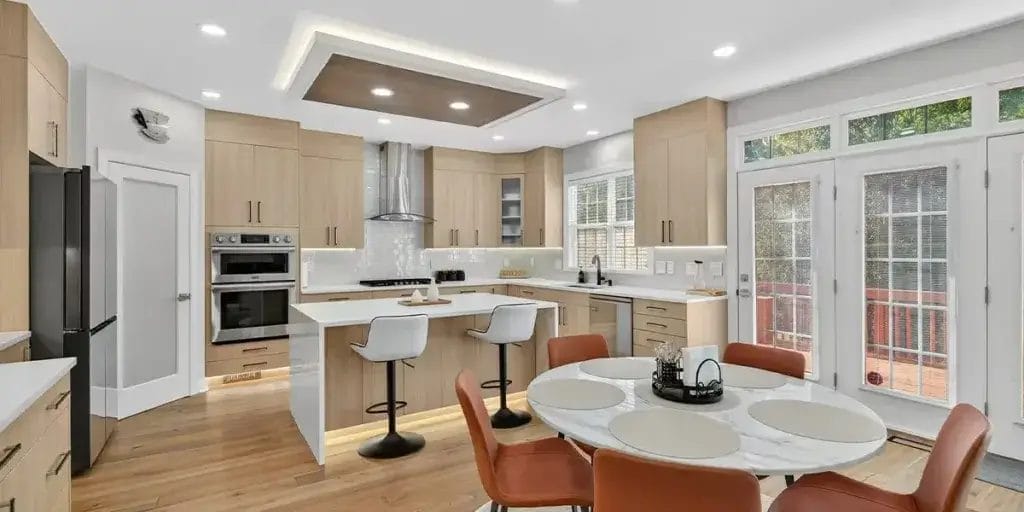
If resale value matters, safer cabinet choices usually perform better:
- white Shaker cabinets
- light wood finishes
- simple modern styles
- neutral colors
These styles appeal to more buyers and age better over time.
Avoid going too personal if you plan to sell soon:
- ultra-dark kitchens
- highly saturated colors
- trendy styles that may feel outdated quickly
In today’s U.S. housing market, kitchens remain one of the highest-ROI remodeling projects, but overly customized designs can reduce buyer appeal.
RTA cabinets can save you 30–60% compared to custom cabinetry, so it’s tempting to buy the cheapest option online. But two Shaker cabinets that look identical on a screen can perform very differently in real life.
Some use stronger plywood construction, better finishes, and more durable hardware. Others may start peeling, warping, or loosening after only a few years.
To help you avoid expensive mistakes, we’ll compare four popular online RTA brands using the same 15×12-foot kitchen layout and a realistic $7,000–$18,000 budget range. Which one truly offers the best value? Let’s find out.
Chapter 2
Side-by-Side Review ($7k–$18k)
Top U.S. RTA Cabinet Brands
Choosing the right RTA cabinet can be confusing. Prices, materials, warranties, and assembly quality vary a lot.
To save you time and money, here’s a clear comparison of top RTA cabinet brands available in the U.S. market, including popular choices and a value‑focused option from Rara RTA Cabinets.
| Brand | Estimated Price (Cabinet Total) | Core Construction | Warranty | Expert Tip |
|---|---|---|---|---|
| The RTA Store | ~$7,796 | ½″ plywood cabinets + HDF doors, full edge banding | 20-year limited | Best value overall. Fast shipping (3 days), free design tools, solid assembly according to user feedback. |
| WholesaleCabinets.us | ~$7,763 | ½″ high-grade birch plywood, very sturdy | 5-year limited | Safety-focused choice. KCMA certified for quality and safety. Shorter warranty but reliable. |
| RTA Cabinet Store | $18,000+ | ¾″ thick plywood, standard soft-close hardware | Depends on series | Premium/high-end. Thickest panels, excellent customer service, frequent large discounts, but high base price. |
| Online Cabinets Canada | CAD $10,000+ | Plywood cabinets, mainly for Canadian buyers | Details unclear | Not recommended for U.S. buyers. Long shipping times, complex cross-border returns if damaged. |
| Rara RTA Cabinets | ~$7,450 | ¾″ Premium Plywood box & shelves, ⅝″ Dovetail Drawer Box, ¼″ HDF back panel, Soft-close glides/hinges | 20-Year Residential Warranty | Factory-direct ¾″ plywood offers high durability at mid-range price; excellent moisture and sag resistance. |
Prices are estimates based on a standard 15×12 layout configuration and current store discounts. Actual pricing may vary depending on door style and custom design choices.
Takeaways
- Look at materials first: Half-inch plywood for cabinets + HDF for doors is a safe, durable combo. Avoid sellers who just claim “all-wood” or “engineered wood.”
- Warranty matters: Longer warranties indicate confidence in quality. Short warranties might mean you’ll pay more later for repairs.
- Shipping & assembly: Fast delivery and clear instructions save headaches. Some brands ship in pieces that fit in your car, others need special handling.
- Price isn’t everything: The most expensive cabinet isn’t always the best. Check materials, finish quality, and brand reliability first.
In the comparison table above, you probably noticed terms like “½-inch plywood” and “HDF doors” appearing again and again. That’s because cabinet materials matter far more than most homeowners realize.
Many brands use vague terms like “all-wood” or “engineered wood,” but two cabinets that look similar online can perform very differently once exposed to heat, moisture, and daily use.
So why do many designers prefer plywood for cabinet boxes and HDF for doors? And which finishes actually hold up best in busy kitchens?
Let’s take a closer look at what your cabinets are really made of.
Chapter 3
Plywood, HDF, and Lowe’s Finishes
Materials & Eco-Friendly Insights
Choosing the right materials for your cabinets is not just about looks. Durability, moisture resistance, and indoor air quality are key. Let’s break it down.
3.1 Cabinet Box vs. Door – Plywood, MDF, and HDF Comparison
| Material | Best Use | Key Features | Pros | Cons |
|---|---|---|---|---|
| Plywood (≥½”) | Cabinet boxes / frame | Cross-laminated wood layers | Strong nail-holding, heavy load capacity, water resistant | Higher cost than MDF |
| MDF (Medium-Density Fiberboard) | Doors (sometimes) | Compressed wood fibers | Smooth finish, easy to paint | Can swell if exposed to moisture |
| HDF (High-Density Fiberboard) | Doors | Denser than MDF, uniform structure | Stable, smooth surface, resists warping/shrinking, durable paint finish | Heavier than MDF, still not fully waterproof |
Reader Tip: For long-lasting cabinets, use plywood for boxes and HDF for doors. Avoid “all-wood” or low-grade fiberboard unless you want repairs in a few years.
3.2 Lowe’s Recommended Finishes – Thermofoil & Duraform
Modern kitchens face high heat, grease, and humidity. Lowe’s officially recommends advanced surface finishes:
| Finish | Method | Advantages | Ideal Use |
|---|---|---|---|
| Thermofoil | Heat + vacuum press plastic film onto board | Seamless 360° protection, water resistant, easy to clean | Everyday high-moisture American kitchens |
| Duraform | Advanced high-pressure lamination | Durable, scratch resistant, smooth surface | Kitchen cabinets exposed to steam and heavy use |
Expert Insight: These finishes outperform expensive painted solid wood in resistance to moisture, stains, and wear.
3.3 Health & Safety – VOCs and Formaldehyde
Cabinets can silently affect indoor air quality:
- Poor-quality glue or unfinished edges release VOCs and formaldehyde.
- Children and sensitive adults are especially at risk.
How to Protect Yourself:
- Choose KCMA-certified cabinets.
- Look for low-VOC paints and adhesives.
- Seal edges properly to minimize gas release.
By choosing safer materials and durable finishes, your cabinets are already built to handle everyday use much better.
But in real kitchens, moisture is still one of the biggest long-term problems.
Humid climates, coastal weather, steam from dishwashers, and small daily leaks can slowly damage cabinet interiors over time. Even expensive cabinets can start swelling, peeling, or developing mold if moisture protection is ignored.
In the next chapter, we’ll look at practical ways to protect your kitchen from humidity and help your cabinets last for years.
Chapter 4
A Systematic Guide for Humid and Rainy Areas
Climate & Moisture Defense
High humidity and heavy rain can ruin even expensive cabinets. In this chapter, we’ll show practical ways to keep your kitchen dry, safe, and long-lasting.
4.1 Sink Area – The “Quiet & Dry Duo”
- Undermount Sinks:
- Water and food scraps fall directly into the sink, leaving no rim for grime or mold.
- Avoid top-mount sinks in high-humidity areas—they trap water along the edges.
- Sink Base Protection:
- Never use MDF or HDF at the bottom of the sink cabinet.
- Use full plywood with a waterproof aluminum foil layer underneath.
- Protects against accidental leaks and long-term moisture damage.
Reader Tip: A well-protected sink cabinet can save hundreds in repairs and prevent mold growth.
4.2 Edge Sealing & Water-Blocking Strips
- All cut edges of boards must have industrial-grade edge-banding to block moisture entry.
- Install water-blocking strips at critical junctions: under sinks, behind faucets, near dishwashers.
Why it matters: Even small leaks or spills can seep into exposed edges and destroy cheap boards. Proper sealing is your first line of defense.
4.3 Ventilation & Daily Dehumidification – Let Your Cabinets Breathe
- Venting Layout:
- Leave hidden vents around high-heat or high-steam appliances: ovens, microwaves, dishwashers.
- Helps moisture escape and prevents condensation inside cabinets.
- Daily Moisture Control:
- Place activated charcoal, silica gel packs, or a small portable dehumidifier in corners or hidden spaces.
- Keep airflow around base and wall cabinets to avoid trapped humidity.
Reader Tip: Regular attention to ventilation and small dehumidifiers can extend cabinet life by years, especially in coastal or southern U.S. climates.
Once your cabinets are protected against moisture and daily wear, the next step is making the kitchen feel enjoyable to live in every day.
Modern kitchen design is no longer just about appearance. Homeowners now want spaces that feel brighter, easier to clean, visually calmer, and flexible enough for real family life.
In this chapter, we’ll explore how designers use color, lighting, smart storage, and low-maintenance design to create kitchens that feel both modern and timeless.
Chapter 5
High-Style, Low-Maintenance Modern Kitchens
Houzz Design Trends
Designing a kitchen is no longer just about storage. Today’s homeowners want kitchens that feel calm, practical, easy to clean, and beautiful enough to enjoy every day. Let’s look at the design trends shaping modern American kitchens.
5.1 Colour & Light Magic – Single-Tone vs. Two-Tone Kitchens
Single-Tone Cabinets – A Timeless Classic
Single-tone kitchens, especially all-white or natural wood finishes, remain popular because they create a clean and unified look that rarely feels outdated.
Benefits of single-tone kitchens:
- visually larger and calmer spaces
- timeless resale appeal
- easier color coordination
- less visual clutter
Warm white, soft gray, and light oak continue to dominate modern kitchen design because they reflect light well and work in almost any home style.
Two-Tone Cabinets – Visual Benefits & Popular Pairings
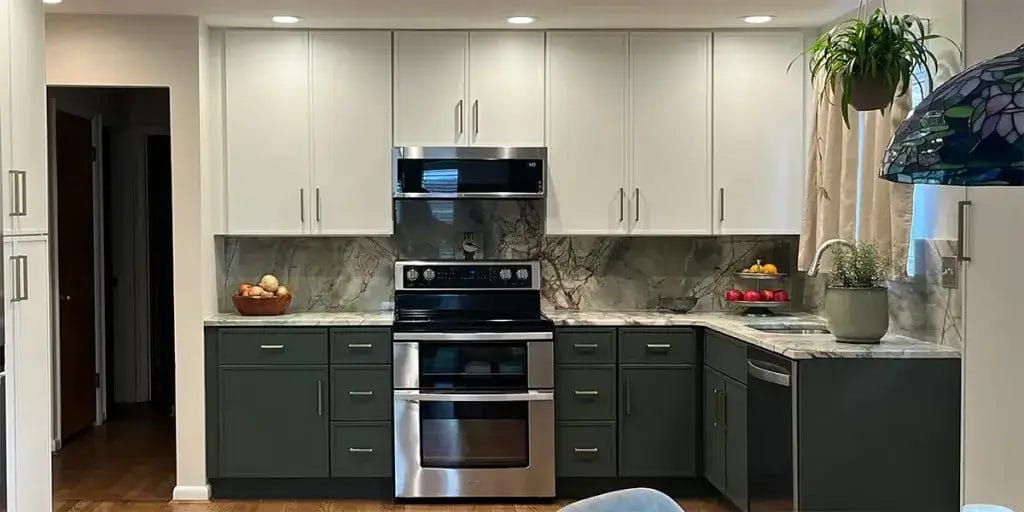
| Common Two‑Tone Scheme | Effect in Your Kitchen | Example Combos |
|---|---|---|
| Light uppers + dark lowers | Keeps space bright above while grounding below | White uppers + navy or charcoal lowers |
| Contrasting island + perimeter | Creates a focal point and depth | Dark island + light perimeter |
| Wood + Paint Mix | Warmth + personality, classic timeless design | Natural oak + painted white) |
| Neutral + Bold Accent | Adds personality without overwhelming | Soft neutral + forest green or navy accent |
Many designers now use darker colors on base cabinets because they hide daily wear and feel more grounded visually.
Reader Tip:
Two-tone kitchens look best when contrast feels balanced. Too many competing colors can make smaller kitchens feel busy or disconnected. Reddit discussions also show that homeowners often prefer simpler two-tone layouts with lighter uppers and darker lowers.
Visual Expansion with Colour & Lighting
Small or darker kitchens can feel much larger with:
- glossy finishes
- warm white cabinetry
- reflective surfaces
- layered lighting
Under-cabinet lighting and lighter upper cabinets help bounce light throughout the room, making kitchens feel brighter and more open.
5.2 Handleless & Modern Minimalism
Push-to-Open & Handleless Kitchens
Modern homeowners increasingly prefer cleaner cabinet surfaces with fewer visual interruptions.
Benefits:
- easier cleaning
- less grease buildup
- minimalist appearance
- calmer visual flow
Handleless kitchens also work especially well in smaller homes because they reduce visual clutter.
Smart Door Systems
| System | How It Works | Best Use |
|---|---|---|
| Flip-Up Doors | Doors lift up and out of the way instead of swinging open. | Upper cabinets or appliance garages where swing clearance is limited. |
| Pocket Door | Doors slide horizontally into a hidden cavity inside the cabinet. | Coffee stations, pantries, or zones you want to conceal without blocking walkways. |
This “hidden kitchen” concept is becoming increasingly popular in modern open-plan homes.
Reader Tip:
Handleless kitchens look simple, but the hardware behind them matters even more. Invest in high-quality hinges and soft-close systems to avoid alignment issues later.
5.3 Visual Extension – Glass Doors & Hutch-Style Cabinets
Too many solid upper cabinets can make kitchens feel heavy and closed in.
To soften the space, many designers now mix in:
- glass-front cabinets
- fluted glass
- open shelving
- tall hutch-style display cabinets
These elements:
- reflect more light
- reduce the “wall of cabinets” effect
- create visual breathing room
- display beautiful dishes or décor
Fluted glass cabinets are also becoming increasingly popular because they add texture while partially hiding clutter.
Reader Tip:
Glass cabinets look best when styling stays simple and organized. Too many visible items can quickly make a kitchen feel cluttered.
5.4 Trends & Forward Thinking
Modern kitchens are moving toward a more seamless and low-maintenance lifestyle.
Growing trends include:
- hidden built-in appliances
- integrated charging stations
- sustainable materials
- low-VOC finishes
- easy-clean surfaces
- smart lighting systems
Many homeowners now prioritize kitchens that feel easier to live with long-term rather than overly decorative showpieces.
Sustainability is also becoming more important:
- recycled materials
- durable finishes
- longer-lasting cabinet construction
- energy-efficient appliances
The future kitchen is not just stylish—it’s quieter, cleaner, smarter, and easier to maintain.
Designing a beautiful kitchen on paper is exciting. But for many homeowners, the real challenge begins when the RTA cabinet boxes finally arrive at the house.
Assembly may look simple online, but uneven floors, crooked walls, missing level lines, and installation mistakes can quickly turn a dream kitchen into an expensive problem.
In the next chapter, we’ll cover practical installation advice, real-world DIY lessons, and the small details that make the difference between a kitchen that looks good for a few months—and one that lasts for years.
Chapter 6
Hard-Won Tips from the Field
On-Site Assembly & Pitfall Avoidance
Installing RTA cabinets can feel like building a life-sized Lego set. Done right, it’s satisfying and cost-effective. Done wrong, it can destroy your countertop, floor, and patience. Here’s how to get it right.
6.1 Four Assembly Secrets – RTA Mastery
| Secret | How-to | Why it matters |
|---|---|---|
| Wood Glue for Extra Strength | Apply high-quality wood glue (e.g., Titebond II) to all joints, dowel holes, and panel connections before tightening screws. | Ensures cabinets stay rigid and silent for 20+ years. |
| Acclimate the Boards | Let boards rest 1–2 days indoors before assembly. Adjusts to local humidity and temperature. | Prevents warping, twisting, and cracking from sudden climate changes. |
| Adjust for Non-Perfect Walls | Use a table saw to trim base cabinets’ backs as needed to fit uneven walls (common in older homes). | Ensures cabinets sit flush and stable, avoiding gaps or stress. |
| Order Physical Samples First | Request small cabinet or door samples before buying full sets. Check colour, finish, and texture under your kitchen lighting. | Avoids surprises with finish, color mismatch, or material feel. |
Reader Tip: Even with the best RTA brand, poor prep can ruin your cabinets. Take the time to follow these steps—it’s worth it.
6.2 Critical Areas – Wall Mounting & Perfect Leveling
Marissa’s story: A DIY homeowner assembled all base cabinets at home, but without a laser level, the cabinets were slightly uneven. When the expensive quartz countertop arrived, installers refused to fit it twice. The result? The cabinets had to be disassembled, leveled, and reinstalled.
Golden Rule:
- Assemble at home like Lego.
- Hire a local handyman or carpenter for:
- Wall cabinet mounting
- Drilling & securing heavy appliances
- Laser-level alignment of base cabinets
This combination maximizes savings and guarantees success.
6.3 Hidden Costs – The True Cabinet Budget Formula
Don’t rely on the single-page RTA price. Include all related expenses:
Total Cabinet Cost = RTA Cabinet Price + Shipping / Freight + Sample Fee + Assembly & Leveling Labor + Countertop Material & Fabrication + Trim / Crown / Toe Kick + Optional Accessories (pull-outs, organizers, handles)
++++++=
$0.00
Reader Tip: Planning for these hidden costs early prevents budget shock later.
Conclusion & FAQ
Honest Thoughts from Someone Who’s Seen It All
Personal Reflection
I’ve spent years helping people choose kitchen cabinets, and I’ve seen it all — from couples arguing over color swatches to families gathering for their first home-cooked meal around a new island. Cabinets aren’t just storage — they shape how you live in your kitchen every day.
Here’s what I’ve learned: there’s no one perfect choice for everyone. The right cabinets for your home depend on your budget, your lifestyle, and how long you plan to stay in this kitchen. Cabinets that fit your current life and family routines — that’s the real win.
So let’s be honest about what matters most and how to think about these decisions in real life.
Should You Go Cheap or Expensive?
At the end of the day, “cheap” vs “expensive” isn’t the real question. Instead, ask yourself:
- What’s your budget? How much are you comfortable spending today?
- Are you confident DIYing assembly or leveling, or would you rather hire help?
- How long will you live in this home? A quick flip vs a kitchen you’ll use for decades matters.
Practical Perspective:
- Tight budget + short stay → RTA cabinets can save 30–60% while still performing well if chosen carefully.
- Long-term home + high finish expectations → Semi-custom or higher-end RTA installed professionally often delivers the best balance of durability and aesthetics.
- Always include hidden costs like shipping, samples, assembly, countertops, and trims when planning your total spend.
Remember — cabinets are the backbone of your kitchen. Wise choices now mean fewer headaches later.
Kitchen Cabinet Buying Guide FAQ
Q1: What’s the real difference between RTA cabinets and IKEA?
A: IKEA offers a strong ecosystem of internal accessories, modular sizing, and decades of tested hardware. Many RTA brands focus on plywood boxes and basic cabinetry construction that can feel more solid, but the real performance depends on materials and hardware you choose.
Q2: What if boards are damaged during shipping?
A: Before you buy, screenshot the brand’s return policy and delivery guarantees. Many reputable RTA retailers have clear damage-replacement policies. Once your cabinets arrive, open every box within 48 hours, take photos of any damage, and start your claim promptly while evidence is fresh.
Q3: Can I assemble RTA myself or hire a professional?
A: You can DIY base cabinet assembly if you’re comfortable with basic tools, but wall cabinets, leveling, and heavy countertops are often worth hiring a local handyman or carpenter for. This hybrid approach saves money and avoids costly mistakes.
Q4: How do I decide between cheap RTA and more expensive options?
A: Think about how often you use the kitchen, how long you’ll stay, and how long you expect the cabinets to last. Cheap options might work well for short-term rentals or budget builds. If longevity matters, prioritize quality materials and reliable warranty support.
My Final Thought
I’ve seen kitchens come and go — and I’ve also seen families light up as they share their first dinner in a space that finally feels right. Cabinets aren’t perfect objects; they’re tools of everyday life. What matters most isn’t price tag alone — it’s how well they fit your family’s routines, withstand daily use, and make your kitchen feel like home.
Choose wisely, not just cheaply or merely beautifully — but in a way that helps you enjoy every day you spend in your kitchen.

About author

Related posts

Some kitchen trends come and go, but Shaker cabinets have remained a staple in American kitchens for generations. Known for their simple recessed-panel doors and... Continue reading
If you’re planning a kitchen upgrade, this is probably your first question:“How much should I really spend on cabinets?” And I’ll be honest with you—there’s... Continue reading

Bathroom color trends in 2026 are moving toward warmer, more natural palettes rather than stark white and cool gray alone. Light neutrals remain the safest... Continue reading
Last Updated: August 26, 2026 Kitchen cabinet cost in 2026 can range from about $50 to $900+ per linear foot for cabinets alone, while installed... Continue reading
Your guide to understanding warranty coverage for Ready-To-Assemble kitchen cabinetry When you’re remodeling a kitchen in the U.S., more and more homeowners are choosing RTA... Continue reading





Add comment